
You are using an out of date browser. It may not display this or other websites correctly.
You should upgrade or use an alternative browser.
You should upgrade or use an alternative browser.
The Reenmachine DOHC '67 Shelby Clone Convertible Progress
- Thread starter reenmachine
- Start date


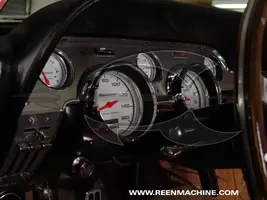
I wanted to do something a bit different with the cluster for this car. I used Stewart-Warner Maximum Performance gauges and wired them to plug right into the Painless harness. They're pretty much equivalent to the Auto Meter Phantoms I normally use, but the faces are a bit bigger, the lighting is a bit more even, and the button for the speedo functions is mounted remotely instead of on the face of the gauge. It was harder and more time-consuming to build the cluster though.
I tell you, the one thing that's gotten honed throughout the course of this project is my wiring skills...


I tell you, the one thing that's gotten honed throughout the course of this project is my wiring skills...
Attachments


I'm too skeered to cut my factory console for a head unit, maybe if they start making them in repop I will cut up one of them. Until then I plan on putting the factory 8-track into the console and doing a remote mount head unit, haven't decided on trunk versus glove-box yet.
On your electronic speedos...are you using a hall effect sender?
On your electronic speedos...are you using a hall effect sender?
SN65
Member
Hi E,Edbert said:Bob, why would you want a bunch of obnoxious spoiled children there? They'll just get sticky fingerprints all over your rides!

I didn't meen brats, I meant BRATS. you know, those sausage shaped, beer soaked, cooked on the grill, but them in a bun and eat um.

It must be my Chicago accent comeing through.
")
Bob
Yes, I typically use the AutoMeter 5292 sending unit, which plugs right into the speedometer hole on the tranny. The T45 in this car already has an electric sending unit though.Edbert said:On your electronic speedos...are you using a hall effect sender?
I was gonna say....your part of the country can probably yield better brats (bratwurst, that is) , but I can definitely bring the beer!SN65 said:Hi E,
I didn't meen brats, I meant BRATS. you know, those sausage shaped, beer soaked, cooked on the grill, but them in a bun and eat um.
It must be my Chicago accent comeing through.
Bob

Reen,
Nice choice on the gauges! Its good to see something a little different than the standard Autometers.
The car is coming along beautifully! I can't wait to see this at one of the shows. Your quality of fit, finish, and paint are amazing. Congratulations on such an impressive stang.
Nice choice on the gauges! Its good to see something a little different than the standard Autometers.
The car is coming along beautifully! I can't wait to see this at one of the shows. Your quality of fit, finish, and paint are amazing. Congratulations on such an impressive stang.
The console has a volts gauge and an oil temp gauge. I worked on it today and will post pics soon. It also has the "check engine" LED, power top switch, driving light switch, etc.eisinger said:Are you planning on having a voltage meter or charging idiot light hidden somewhere?

It's made by Earl's and is part #41310AERL:joesgt281 said:Reen,
Can you tell me what brand oil cooler you used and the specific dimensions of it?
Thanks,
Joe
http://www.holley.com/types.asp?type=244
The dimensions are 4" tall x 2" deep x 13" wide with -10AN fittings.
reenmachine said:It's made by Earl's and is part #41310AERL:
http://www.holley.com/types.asp?type=244
The dimensions are 4" tall x 2" deep x 13" wide with -10AN fittings.
Good...I had looked at that one.
Will have mine on order today...thanks!
65mistress
Member

OK -- I was out of town for a while actually taking some time off with the fam, but it's back to work!
I got all of the glass in and aligned, including the remaining power mechanisms. All four windows run up and down smoothly under their own power. I had all of the stainless trim straightened and buffed to a mirror finish and it looks fantastic.


I got all of the glass in and aligned, including the remaining power mechanisms. All four windows run up and down smoothly under their own power. I had all of the stainless trim straightened and buffed to a mirror finish and it looks fantastic.
Attachments


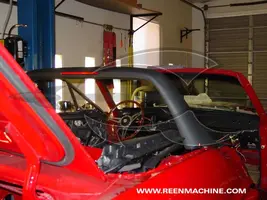
This was a big, time-consuming project...the roll/light bar. If you remember back a while, I had been in the process of attempting to fit a repro '68 Shelby padded bar. The quality of the bar was so abysmal that I decided to explore other options. I just couldn't bring myself to install a 4-point bar as I feel it just doesn't fit the image of this car, so I tried to resolve the fitment issues with the manufacturer of the padded bar. He basically told me to stuff it, and that not getting the bar to fit was because I'm a crappy fabricator, not because he's a crappy manufacturer. Yes, he expected me to pay $700 for a product and then completely rework it to fit without seeing anything wrong with this scenario. I must say that I did get good customer service from Branda on this issue, with Tony Branda calling me and dealing with my issues directly. They don't manufacture this bar, they just sell it.
Anyway, I ordered a "Classic Light Bar" intended for a '90-'93 Mustang from Classic Design Concepts and reworked it to fit the '67. I figured that if I was going to have to rework something, why not make it a cooler bar with the LED 3rd brake light. This proved to be a very high quality product overall -- worlds better than the repro Shelby bar.

Anyway, I ordered a "Classic Light Bar" intended for a '90-'93 Mustang from Classic Design Concepts and reworked it to fit the '67. I figured that if I was going to have to rework something, why not make it a cooler bar with the LED 3rd brake light. This proved to be a very high quality product overall -- worlds better than the repro Shelby bar.
Attachments
There's not a whole lot to it, and there are many different ways -- I'd suggest going to a street rod show and look at how those guys do motor mounts. You can get some of the parts you need from rod part vendors as well, and make the rest. I made a piece that bolts to the bolt pattern on the block, made "towers" coming up from the crossmember (and braced to the sides), and made it so you can bolt the two together with a cylindrical polyurethane bushing in between. Make sure you get the engine angle right.eisinger said:Reen- In looking back through the thread you talk about positioning the engine and fabricating the motor mounts. Can you elaborate on how you mounted the motor?...I'm having a hard time seeing how it all goes together. Thanks.
It's kind of hard to describe, but if you go to the next available street rod show in your area you'll see tons of great examples.
What was required for the "Classic Light Bar"?
I'm building a similiar car - 68 shelby convertible - R&C front-end, 600HP 429SCJ engine, FPA Headers, etc. Are you still using the shelby rear interior panels? I was just thinking of jusing that bar, i had the same one on my 92' saleen convertible.
are you going to use the cloth top?
http://www.autostyles.com/sunfast.htm
reenmachine said:This was a big, time-consuming project...the roll/light bar. If you remember back a while, I had been in the process of attempting to fit a repro '68 Shelby padded bar. The quality of the bar was so abysmal that I decided to explore other options. I just couldn't bring myself to install a 4-point bar as I feel it just doesn't fit the image of this car, so I tried to resolve the fitment issues with the manufacturer of the padded bar. He basically told me to stuff it, and that not getting the bar to fit was because I'm a crappy fabricator, not because he's a crappy manufacturer. Yes, he expected me to pay $700 for a product and then completely rework it to fit without seeing anything wrong with this scenario. I must say that I did get good customer service from Branda on this issue, with Tony Branda calling me and dealing with my issues directly. They don't manufacture this bar, they just sell it.
Anyway, I ordered a "Classic Light Bar" intended for a '90-'93 Mustang from Classic Design Concepts and reworked it to fit the '67. I figured that if I was going to have to rework something, why not make it a cooler bar with the LED 3rd brake light. This proved to be a very high quality product overall -- worlds better than the repro Shelby bar.

Attachments

I basically reshaped the steel legs of the bar to fit the contours of the inner quarter panel in such a way that the window mechanism adjustment is still accessible. Cut, bend, weld. The bar is significantly wider than a stock one, which presented some issues, and it has to be positioned "just so" to clear the top frame. I'll at least use part of the Shelby interior panels, but they'll need to be modified and I think I'll have them upholstered to match the interior and hide the mods.mdwebguy said:I'm building a similiar car - 68 shelby convertible - R&C front-end, 600HP 429SCJ engine, FPA Headers, etc. Are you still using the shelby rear interior panels? I was just thinking of jusing that bar, i had the same one on my 92' saleen convertible.
are you going to use the cloth top?
http://www.autostyles.com/sunfast.htm
Don't know what kind of top I'll use yet. It'll be white though.
Got the dash pretty much buttoned up yesterday. The dash pad was fun -- loooooove spending 5 hours on a 30 minute job. I feel like I trimmed half of the thing away before it would fit how I like. It's the Dashes Direct pad, which is the best one on the market (of the 2 choices...), but it took a lot of trimming, especially above the passenger side trim piece. After I put the A/C unit back in, the glove box can go in and the dash will be done.
Note the small pushbutton switch on the end of the turn signal lever -- it is the high/low beam headlight switch. It works really nicely with just a tap of the finger.
Yes, that mat on the floor will be replaced with proper sound damping material.


Note the small pushbutton switch on the end of the turn signal lever -- it is the high/low beam headlight switch. It works really nicely with just a tap of the finger.
Yes, that mat on the floor will be replaced with proper sound damping material.
Attachments


Similar threads
- Replies
- 2
- Views
- 201
- Replies
- 4
- Views
- 608
Progress Thread
Shelby's Mustang - project revived after 7 years...
- Replies
- 13
- Views
- 3K
- Replies
- 7
- Views
- 6K