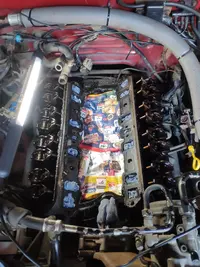
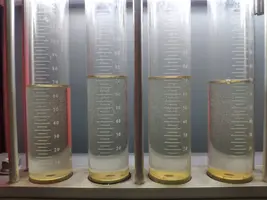
Cold engine compression test done:
1: 9bar - 130psi
2: 9bar - 130psi
3: 9.5bar - 138psi
4: 9bar - 130psi
5: 9bar - 130psi
6: 9.5bar - 138psi
7: 9bar - 130psi
8: 9.5 - 138psi
I would say okay.
Complete engine seals are in trunk allready.
Sometime in next two weeks we will lift both intakes, valve covers, try to change valve seals, check and rehaul coolant pump and lurk into timing chain when we will be down there... anybody has anything else to recommend around that construction sites?
")
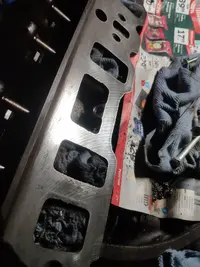
In between I will try to blow that carbon out with driving
Cheers!
Timing cover/harmonic balancer removal and replacement
The first steps are the same as replacing a water pump, but for reference I will include them too.
You will notice the phrase “
in a zip bag or your loose parts bin” gets lots of repetition. This is an important concept to embrace, especially if the project stretches out more than a day or two. Some of us are neat and organized and work that way. Congratulations go out to you, because most of the hobbyist mechanics are not members of that elite group. You will need a box of sturdy quart size zip bags and a Sharpie marker to label them with along with the normal range of sockets and wrenches used in auto repair.
Time to complete this job will be 10-12 hours, maybe less if you are fast and don’t stop to take breaks.
Water pump removal
1.) Disconnect the battery negative terminal and cover the battery with heavy cardboard or at least 2 shop towels. You’ll thank me for this suggestion about the time you lay a long wrench or screwdriver over on top of the battery.
2.) Drain the radiator; most radiators have a drain valve or drain plug on the lower passenger side of the radiator. In most cases you either have to have really long skinny arms or have to jack the car up to get to it.
Plan B is a little simpler, but it involves more equipment: an air compressor, some air hose, a blowgun with a long skinny nozzle, and 6 ft. of scrap garden hose. A small diameter garden hose works better than large hose because you have to thread it through the radiator filler opening and past the transmission cooler. Cut a small hole just big enough to stick the blow gun nozzle in the garden hose about 6”-12” from the end, Stick the other end of the garden hose in the radiator as far down as you can get it. Stick the free end of the hose in your bucket or whatever container you are going to use. You’ll need to be able to capture about 1 ½ - 2 gallons of coolant. Stick the blowgun in the cut you made in the hose and give it a squeeze. If you are careful, it will start to siphon all of the coolant out the radiator and not spray coolant everywhere.
3.) Now comes the messy part; crawl under the car and remove the lower radiator hose clamp, radiator hose and then the radiator. Plan on spilling some coolant and getting wet in the process. I have done it 3 times over the last year and have always got a bath in coolant and a big spill to rinse down when I finished.
4.) Disconnect the upper radiator hose and the auto transmission cooler lines if this is an auto transmission car; be sure to cap the transmission cooler lines on the radiator and the lines to keep dirt and trash out of them.
5.) Remove the two10MM hex head radiator hold down bolts and brackets and put them in your parts bucket.
If this the first time you have done this job, put each set of fasters or small parts in individual zip bags and mark the bag with a description of where they came from with a sharpie marker. About the time you go to putting it back together, you’ll be glad that you took the time to do this. This is a good habit to develop if your project looks like it will stretch out longer than a day or two.
6.) Remove the fan shroud bolts that secure the fan shroud to the radiator and put them in you parts storage container or zip bag. Lift the radiator shroud clear of the slip clips that hold it to the bottom of the radiator and move it as far back away from the radiator as possible. Trim a large piece of cardboard to the width of the radiator and about 6” taller than the radiator. Now slide the cardboard down between the radiator and the fan shroud and lift the radiator out. You have prevented dinging the radiator or poking holes in it with this simple step. Save the cardboard, you will use it again when you put the radiator back in the car. Remove the radiator shroud and put it in a safe place along with the radiator. Watch out for the coolant in the overflow tank; a pan or jug needs to be handy to drain the coolant stored in it.
7.) Serpentine belt; if you have anything other than the stock arrangement, take a picture of how it fits around the pulleys BEFORE doing anything else.
Use a 17 MM socket and a long breaker bar to lift the belt tensioner off the serpentine belt. Remove the belt from the pulleys and check it over for frayed places or cracks; replace it now while you have it off and in hand. This is especially true if you have a non- stock belt arrangement.
8.) Use a 7/16” flat ratchet or gearwrench to remove the 4 bolts that hold the fan on the water pump. Remove the nuts from the 3 studs on the water pump, and the 2 power steering mount bolts and the 3 bolts that secure the A/C compressor (if present) to the A/C & PS mount plate. Loosen one bolt on the rear of the lower A/C mount; this will require a long extension and maybe universal joint socket. Put the bolt and the nuts in a zip bag or your loose parts bin.
9.) Remove the lower radiator hose from the water pump and put both hose clamps in a zip bag or loose parts bin.
Take a cardboard box, and turn it upside down. Count the number of bolts that hold the water pump on, don’t forget to count the 4 funny looking studs. Poke a hole in the box for each bolt/stud. Arrange the holes in a circular formation, and mark the box at the 12:00 point. When you remove a water pump bolt, put it in one of the holes in the box according to where it came out of the water pump. When you are done, all bolts will be arranged it the exact same order and position that you removed them from the water pump. That makes re-installing them easy, no wondering where does this bolt go. Put the cardboard with the bolts in it out of the way with the rest of the larger parts.
10.) Loosen the 4 hose clamps on the water pump heater and thermostat bypass hoses. Pull the water pump down and remove the hoses from the water pump and from the engine mounted plumbing that that they connect to. Set the water pump aside with the rest of the large parts.
Take note that the upper thermostat bypass hose goes to the thermostat housing and the lower hose goes to the heater return feed tubing. Put the hoses and hose clamps in a zip bag or your loose parts bin.
This is the end of the water pump removal section.
11.) Now that the water pump is out of the way, remove the harmonic balancer pulley – there are 4 bolts that need to come out. Take note that the bolts are grade 8 and have 6 radial marks stamped on their heads. Don’t lose them and don’t replace them with any bolt of lesser grade.
You’ll need a very long breaker bar and a 15/16” socket and a short extension for the harmonic balancer mount bolt. The breaker bar and socket need to be ½” drive because you will probably need a cheater bar on the breaker bar to get the harmonic balancer bolt loose. If your car is a 5 speed, put it in 5th gear and set the parking brake so that the harmonic balancer doesn’t turn when you try to loosen the bolt. If your car has an auto trans, a chain wrench like those used to remove oil filters may do the trick. Apply it to the harmonic balancer ribs that protrude from the rear of the balancer. A long pipe wrench may also be applied to the same ribs to prevent the engine from turning. A harmonic balancer puller is needed to remove the balancer. If you don’t own one, the auto parts store will loan or rent one to you. Remove the harmonic balancer bolt and washer then put the bolt back in and turn it 4-5 turns back into the crankshaft. The harmonic balancer puller needs to push on the bolt and not on the crankshaft threads. Thread the harmonic balancer puller mount bolts into the holes for the pulley mount until they bottom out; make sure that the bolts are about the same length and not obviously too long or too short. Crank away on the harmonic balancer puller center bolt until the puller hits the balancer mount bolt. You’ll notice a sudden increase in effort to turn the puller center bolt. Remove the puller and then remove the balancer mount bolt. In most cases, the balancer can now be removed by hand and will slide off the crankshaft with a little effort. If not, several washers placed inside the balancer hub and resting upon the end of the crankshaft will do the job. The object is to give the harmonic balancer puller center bolt something to push on and not damage the crankshaft internal threads. At some point, the harmonic balancer will be loose enough to slide off the reset of the way by using only hand power.
When the harmonic balancer is off, examine the surface where the timing cover seal rides. It should be smooth without any noticeable ridges or groves. If it is damaged, here are sleeves available at the local auto parts store that are a hand press fit to cover the damaged area and provide a proper surface for the seal to ride on. Examine the balancer for damage to the thin rubber ring that mounts the outer hub to the inner hub. If you see any damage or deterioration, now is the time to replace the balancer. Your local auto parts store can provide a stock replacement or Summit Racing has aftermarket replacements. Put the harmonic balancer pulley bolts and the balancer mount bolt in a zip bag or your loose parts bin and store them along with the harmonic balancer and the pulley with the rest of the large parts.
End of harmonic balancer removal
12.) Timing cover removal[/b] Take a picture of the timing pointer and how it is mounted before removing the nuts that secure it to the timing cover. You’ll be glad you did when it comes time to reassemble things. Done incorrectly the timing pointer will get bent and mangled the first time the engine cranks over…Don’t ask me how I know…
13.) Remove the bolts that hold the timing cover in place; don’t forget the 2 small bolts that are on the bottom of the oil pan. There may be 2 locator bushings on the lower part of the timing cover that are pressed into the engine block. Some tugging and wiggling will be necessary to get the timing cover off of them; leave them stuck in the engine block if possible. Put the timing cover bolts in a zip bag or your loose parts bin. Take a box cutter or similar tool and cut off the exposed pan gasket where it disappears under the engine block and throw it away. This is part of the preparation for the new gasket that will go here.
14.) Now for the most tiring, time consuming and demanding part of this job; removing
ALL of the old gasket traces from the engine block and timing chain cover. Scrape and clean until you are bored, scrape and clean until you are tired of it and then scrape and clean some more. In order to seal properly, gaskets have to seat against clean, bare metal. A thin film of silicone gasket sealer helps, but is not a proper substitute for clean mating surfaces for the gaskets. The scraping and cleaning is tiresome, but it is less work than having to do it all over again because the gaskets didn’t seat and seal properly in spite of the excess amount of silicone sealer you applied to all the surfaces.
Set the timing cover aside with the rest of the large parts. Take some plastic sheeting or newspaper and cover the timing chain and the crankshaft to keep the mess you are going to make scraping the old hardened gasket remnants off the engine block out of the timing chain and oil pan. A single edge razor blade scraper is the preferred tool for this job, and you’ll need some quality spare blades. Hopefully, most of the sticking gasket remnants are on the engine block and not on the soft aluminum timing chain cover and water pump.
A stainless steel rotary wire brush in an electric or air drill will be needed to get the really hard gasket material off the iron parts. DO NOT use it on aluminum parts!!! The cast iron resists the cutting action of the rotary brush well enough that it will not remove a significant amount of metal or make any groves or scratches that will cause leaks. DO NOT use ScotchBrite or similar scrubber pads because they can leave behind significant amounts of abrasive grit that can find its way into the engine oiling system and wreak havoc on the engine’s internal parts.
15.)
Cleaning, inspection, and preassembly.
Now it’s time to clean and inspect all the parts you removed for damage and corrosion. The rubber hoses connected to the water pump may have become casualties of time, wear and of being removed, so be prepared to buy new ones. Replace all of the non-worm gear type hose clamps with new hose clamps. Home Depot or Lowes plumbing dept. will have them cheaper than the auto parts stores. Buy a 5 or even 10 clamp package of the smaller size hose clamps as shop supplies; you’ll be glad you did. Check the fan clutch to make sure that it has some resistance against being turned with you holding the hub that bolts to the water pump flange. Check the plastic fan blades for cracks and damage. Having a fan blade fly off at 5000 RPM can surely ruin the radiator, the hood and maybe even your whole day. Check the belt for cracks, frayed spots and other visible damage. Turn all the accessory drive pulleys by hand to make sure that they run true and turn smoothly; make sure that they are not bent or cracked. Check the belt tensioner pulley; it should run true and turn smoothly. Check the radiator and fan shroud for evidence of cracks, broken mounts and check the radiator for evidence of leaks. There is a rubber cushion on each of the radiator hold down brackets and another set of cushions where the bottom of the radiator sits in the radiator mount frame. If you remove the bottom cushions, mark which side they came from and their orientation; they are side specific due to the rubber alignment bumps on the side that mounts to the metal support brackets they fit in. Inspect them to make sure that they are present and in good condition. Crawl under the car and spray some non-flammable brake parts cleaner over all the parts that have any oil on the outside. While you are under the car, wipe away and blot up any evidence of coolant leaks you find. This will save you time later on trying to chase leaks that you fixed but didn’t clean up after you fixed them.
Now it is time to take s short break and paint
ALL of the bolts under the heads and on the threads with a generous amount of anti-seize. A 1 pound, brush top can of Never Seez is one of the best investments you can make in shop supplies. It costs $20-$25, but it will save you countless hours when you disassemble things next time. Bolts don’t corrode, freeze up or break off if you coat them with generous amounts of Never Seez. And yes, as long as you own the car, there will be a next time…
16.)
REASSEMBLY:
It’s time to double check the parts and gasket mating surfaces to make sure that they are clean and have no bits of leftover gasket material, damage to the mating surfaces, dirt or debris. I recommend that you use the following stay in place gasket trick to keep the gasket from shifting out of place during installation. Wipe down the gasket mating surfaces with acetone so that they are perfectly free of oil, debris and dirt. Mock fit the gasket so that you know which side faces the water pump. Spray the gasket mating surface of the water pump with weather strip adhesive and also spray the pump gasket side that mates to the water pump. Follow the instructions on the can as to drying time; the surfaces should be tacky, but not damp or dry. CAREFULLY align the gasket with the holes on the water pump; you will have a very limited opportunity to reposition the gasket once it is pressed in place. Apply a thin coat of silicone gasket sealer to the timing cover face around the water passages. Remember that the silicone sealer starts to set within 3-5 minutes and you want to assemble it while it is still soft and sticky. Bolt the water pump to the timing cover using the 3 short bolts across the top of the water pump; torque to 15-18 ft/lbs or 180-210 in/lbs.
17.) Now comes the fun part: assembling the timing cover. If you are reusing your old timing cover, use a punch and hammer to drive the harmonic balancer old seal out from the inside. Apply a thin coat of silicone sealer to the timing cover where the new seal will sit. Use a 2x4 block of wood larger than the seal or a seal driver to tap the seal in place. The block of wood method works good, but you have to watch carefully to make sure that the seal is going in straight. When the metal flange of the seal is flush all around with the face of the timing cover, you are done with the seal. Make sure that the timing cover and pan gasket surfaces are absolutely clean. Use a paper towel or clean rag saturated with acetone to wipe them down. Make two or more passes until the rag or paper towel comes away perfectly clean. Make careful note of which side of the gasket mate with the timing chain cover. Take some weather strip adhesive and spray the timing chain cover and the timing chain cover gasket side that mates with the timing chain cover. Let it get tacky as you did with the water pump gasket. CAREFULLY line the gasket up with the timing chain cover and then press it in place. Make sure of the alignment is correct, because you won’t have much opportunity to move it once it is pressed in place.
I’m going to make some of you cringe, but the next step will help insure a leak free installation. Remember that I told you to cut away the old pan gasket flush with the engine block? Here’s why…
Take a Felpro OS 34508 R one piece silicone rubber pan gasket and mock fit it to the timing cover. Be sure to press it tightly into the curved bottom of the timing cover; when you are satisfied that it fits perfectly, then proceed to the next step. Stand the assembly on the workbench and press the assembled timing cover and gasket down on the bench. When you have it positioned correctly, the flat bottom end of the timing cover is firmly pressing down on the pan gasket. Use a box cutter knife or ball point pen to mark the place where the pan gasket extends beyond the timing cover. Do the same thing to the other side; the closer you are to having the cut or mark exactly at the edge of the timing cover flange where it meets the engine block, the better results you are going to have. Next take a pair of sheet metal shears and cut the gasket where you made the mark. The gasket has a metal core, so a good pair of sheet metal shears is needed to do the job properly. Now you have horseshoe piece of the gasket that perfectly fits the timing cover. Take a tube of regular superglue and run a stream of it around the edges of the timing cover gasket surfaces. Then press the horseshoe shaped section of the pan gasket into place; start with center piece first and work towards the ends. Press hard, keep the gasket lined up with the sides and the holes. When done correctly, the gasket looks like it was made as part of the timing chain cover; no gaps, no out of place holes, all the edges line up perfectly. The superglue may be slow to completely set, but you can use that to your advantage. Some small pinch clamps or clothes pins (remember those?) may be useful to hold the gasket in place until the superglue completely sets, so be sure to have them close at hand. Set the timing chain cover aside for 30 minutes or more to give the superglue time to set. Once it sets, the gasket isn’t moving or slipping out of place no matter what you do. You’ll welcome that assurance about the time you try to maneuver the timing chain cover in place while working to get it lined up properly. Take your silicone sealer and make 2 good size streams where you cut the old pan gasket off at the engine block; that will seal the new gasket to the old gasket, engine block and oil pan. Smear a thin layer of your silicone sealer all along the oil pan mating surfaces, with a little extra added to the curved section of the oil pan where it fits to the timing chain cover. Smear some more of the silicone sealer on the engine block where the timing chain cover fits and especially around the water port openings.
18.) Put the short heater feed hose and thermostat bypass hose on the water pump along with the 4 hose clamps. All of the hose clamps will need to be oriented so that the screw head is on the driver’s side facing forward or up. Some twisting and turning will be needed to get the hoses in place. Before you tighten any hose clamps, work on getting the timing chain cover in place. The silicone sealer is setting while you are working to get the hoses properly installed and positioned. Some extra effort will be needed to get the timing cover in place to slide over the locator dowel sleeves, but keep at it. You may find that using the long bolts to pull everything in place works or putting the bolts in the lower part of the timing chain works best. A 2x4 wooden block may be used along with a hammer to help seat the timing chain cover in place over the alignment dowels. Put the rest of the 5/16” water pump and timing cover bolts in place and torque them all down 180-210 in/lbs. The 2 smaller oil pan bolts get tightened to72–108 in/lbs. The timing pointer uses 2 studs to mount it, if you were smart; you took a picture of it before you removed it. Bolt back on in the same manner shown in the picture.
19.)
Harmonic balancer installation
Use a clean paper towel to apply a film of motor oil to the crankshaft and to the harmonic balancer surface where the seal rides; wipe it on and spread it all around. Line the keyway slot in the balancer up with the crankshaft key. Slide the harmonic balancer on the crankshaft and install the bolt and washer. If your car is a 5 speed, put it in 5th gear and set the parking brake so that the harmonic balancer doesn’t turn when you try to tighten the bolt. If your car has an auto trans, a chain wrench like those used to remove oil filters may do the trick. Apply it to the harmonic balancer ribs that protrude from the rear of the balancer. A long pipe wrench may also be applied to the same ribs to prevent the engine from turning. Use a 15/16” socket and a short extension for the harmonic balancer mount bolt; tighten it to 70-90 ft/lbs. Now is the time to use the harmonic balancer bolt & the 15/16” socket to rotate the engine through at least 2 revolutions while you watch the clearance between the harmonic balancer and the timing pointer is sufficient to prevent damage to the timing pointer. DON’T try to use the starter to turn the engine when you do this; you may damage the pointer before you can stop cranking the engine.
Install the harmonic balancer pulley and secure it in place with the 4 grade 8 bolts; they will have 6 radial marks stamped on their heads. Tighten the bolts to 35-50 ft/lbs.
20.) Now that you have timing chain cover/water pump assembly bolted in place, go back and move the 4 hose clamps into their final positions and tighten them securely. You may need to twist, turn and tug to get the clamps properly positioned, but do it now because it gets harder with the fan blades and radiator shroud in place Install the lower radiator hose on the water pump and position the clamp so that it is easily accessible. Some tape with one end folded over to make a pull tab is one way to secure the clamp in position so that it doesn’t turn or slide out of position. When you have the hose and clamp just like you want it and don’t plan of moving them when the work is done, tighten the clamp and pull the tape off.
21.) Install the power steering and A/C compressor mount plate, and coat the studs with Never Seez if you haven’t already done so. Put on the nuts from the 3 studs on the water pump, and the 2 power steering mount bolts and the 3 bolts that secure the A/C compressor (if present) to the A/C & PS mount plate. Tighten one bolt on the rear of the lower A/C mount; this will require a long extension and maybe a universal joint socket.
22.) Mount the fan/clutch assembly on the water pump shaft. A 5/16” fine thread bolt with the head cut off makes an excellent alignment aid; screw it into one of the bolt holes. I usually file the end of the bolt to a smooth point to assist in getting it started in a blind location where it is hard to see where the tapped hole is located. Once you have the bolt holes lined up, install the water pump pulley, fan assembly and then fan mount bolts. A 7/16” flat ratchet or gearwrench is a handy tool to use about this time. The alignment aid bolt is usually the last thing you remove when mounting the fan assembly in place.
Install the fan shroud and set it as far back as you can get it. Put the cardboard in front of the fan and shroud and put the lower radiator support cushions back in place if you removed the. Remember that they are side specific and only properly fit one way. Position the radiator and lower it in place; the cardboard will protect the radiator from dings and other damage. Then install the upper radiator hold down brackets and cushions and install the bolts. Don’t tighten them until you are absolutely certain that the radiator is correctly seated in the lower radiator mount cushions. You’ll have to crawl under the car to see if the radiator is sitting perfectly in them. Move the radiator side to side until it is seated squarely in both cushions. Fail to do this and you will rub a hole in the radiator tanks and possibly damage one or more to the tubes.
The fan shroud bottom fits into 2 slip clips that are part of the lower radiator cross brace. They position the shroud so that it doesn’t move forward or backward. The top of the shroud bolts to the upper radiator top cross brace; there is a little maneuver room to move the shroud side to side and up and down. This is the crucial point because there is limited clearance between the tips of the fan blades and the radiator shroud. Rotate the fan blades and make sure that there is at least a finger width of space between the fan blade tips and the shroud. On my car, the shroud set a little bit high and it took some effort to get the shroud pushed down enough so that the fan blade tips didn’t scrape the bottom shroud opening. It is worthy to note that engine torque will lift the engine and decrease the clearance between the top of the shroud opening and the fan blades. Try to keep that in mind when you are bolting everything up after a final fitting.
23.) Now that the radiator is bolted in place, connect the upper and lower radiator hoses and tighten the hose clamps. Remember the tape trick to hold the lower clamp in place so that when you put a socket or screwdriver on them that the clamp doesn’t move out of position. I prefer to have the screw heads facing either up or forward so that they can be tightened without having to crawl under the car to get to them. If you have transmission cooler lines, uncap them along with the fittings on the radiator and install the lines at this time.
Install the serpentine belt; if you have anything but a stock belt routing, now this time to refer to the picture you took of the belt routing. Otherwise, use the belt routing diagram that is on the front radiator cross brace. Make sure that the belt fits inside the pulley flanges and isn’t hanging off the edge of any of the pulleys.
Take a survey of the engine compartment; you should have picked up and accounted for all of the tools, fasteners and miscellaneous stuff and stored it out of the way. Connect the battery and watch out for big sparks when you do. Big sparks or loud pops are an indication that you either left something turned on or there is a tool, nut or bolt lying on top of a bare electrical connector or wire. You may see a small spark due to the radio and computer memory powering on. If there are no big sparks or indication of an excessive electrical draw, then tighten down the negative battery cable.
Make sure that if you drained the radiator by using the removable plug or drain valve that it is plugged or tightened properly so that the coolant will not leak out. It takes somewhere around 2 -3 gallons of coolant depending on the radiator size and how much coolant drains out of the engine block while you are working on the engine.
24.)
Final inspection time
Check all the bolts, screws and clamps to make sure that they are all properly tightened, and the fan blade turns freely without scraping the fan shroud. There should be no loose hoses or disconnected electrical components and no tools or other items left lying on top of the engine. Crank it up and listen for any unusual noises (I heard the timing pointer as it repeatedly hit the harmonic balancer); hopefully there will only the normal sounds of the engine running. Add coolant if necessary and then run the engine up to operating temperature to check the coolant level again. Look for leaks and be prepared to crawl under the car to do so. If there are no leaks, no unusual noises and nothing catches your eye or ear, take it for a short test drive. Keep an eye on the temp gauge, you may find that the coolant level is little low. When you get back, let the engine cool to the point where it is safe to remove the radiator cap and check the coolant level. Add coolant to the radiator and overflow tank to bring them up to the correct level. Do a second leak inspection, crawl under the car to check it out. Put the large piece of cardboard you used to protect the radiator during removal and installation under the engine to act as a drip indicator. No drip marks on the cardboard over the next few days is a good thing; you have fixed your leak or leaks.
25.)
Follow up:
After 10 or so hours of engine operation, change the oil and oil filter. All the debris from scraping and removing the old gasket pieces have made their way down into the oil pan and oil filter, so it is recommended to change them. Look for evidence of coolant contaminating the oil; milky oil is not good. It may be due to the coolant that dripped into the open oil pan while the timing cover was off. Or you may have a hidden leak from a gasket that got damaged during installation. Do another leak inspection while you are draining the oil, hopefully it will all be clean and dry. You may also want to change the coolant if you reused it. No problems found and no drips on the cardboard mean a happy owner

. Enjoy driving a leak free 5.0 Mustang!


 . 2.73:1 stock ratio, but I cant turn the tyres on pavement. On US movies with muscle cars they get tyres squeal on gravel, grass, mud, metal, wood, road, everywhere