
You are using an out of date browser. It may not display this or other websites correctly.
You should upgrade or use an alternative browser.
You should upgrade or use an alternative browser.
'88 GT Convertible - Croatia, Europe
- Thread starter snovak
- Start date
-
- Tags
- assembly lube engine bay
Thanks for support everyone. Really!
@Noobz347 unfortunately not that I know, but a principle looks great!!!
When looking at it, it crossed in my mind about giving some diesel/wd40 spray/flush thru all drain holes of lower intake and valve gallery just minutes before letting old oil cold without cranking out the engine......then pouring oil on top after few hours of drain.
Call me stupid, but that would actually make me less scared than putting engine cleaner in 32 yo virgin crankcase, probbably full of sludge as upper part. Even if it does sound 'bad' or creepy at least.
The fact is also that I cant remove bottom pan this winter.
I will poke in a boroscope in next few days...
Okay, the spare time is beeing used:
I am tearing down hidro lifters. First I though that all are stuck cause I gained no movement from soaking few hours in diesel, but then I saw principle after taking one apart and maybe they should be hard:
When oil gets out they go in with pinky finger.
Is it normal You cant push them in, full of oil as taken out from engine and with quite a force/finger?
Eitherway, the lifters top and side passage is okay on all of them, but a bottom of lifters was from little to hardcore dirty as more they go back to the engine. Black hard crud in lower 'cup' above spring.
Some of that lower cups went out quite hard with a lot of WD40/petrol lubing/cleaning in between.
Maybe could be a cause of occassional ticking.
This night I am giving them a good bath in petrol (fuel), not diesel.
I will soak them and assemble in oil, or a little bit of WD40. AFAIK priming the engine is now a must.
Working with 5 in batch (could not stole more tupperware boxes from SWMBO") ), so if somebody wants pictures, let me know.
), so if somebody wants pictures, let me know.
Is there any home garage mechanic procedure to check/proove that hidro lifters are okay?
Any advices are welcome...
Greetings!
@Noobz347 unfortunately not that I know, but a principle looks great!!!
When looking at it, it crossed in my mind about giving some diesel/wd40 spray/flush thru all drain holes of lower intake and valve gallery just minutes before letting old oil cold without cranking out the engine......then pouring oil on top after few hours of drain.
Call me stupid, but that would actually make me less scared than putting engine cleaner in 32 yo virgin crankcase, probbably full of sludge as upper part. Even if it does sound 'bad' or creepy at least.
The fact is also that I cant remove bottom pan this winter.
I will poke in a boroscope in next few days...
Okay, the spare time is beeing used:
I am tearing down hidro lifters. First I though that all are stuck cause I gained no movement from soaking few hours in diesel, but then I saw principle after taking one apart and maybe they should be hard:
When oil gets out they go in with pinky finger.
Is it normal You cant push them in, full of oil as taken out from engine and with quite a force/finger?
Eitherway, the lifters top and side passage is okay on all of them, but a bottom of lifters was from little to hardcore dirty as more they go back to the engine. Black hard crud in lower 'cup' above spring.
Some of that lower cups went out quite hard with a lot of WD40/petrol lubing/cleaning in between.
Maybe could be a cause of occassional ticking.
This night I am giving them a good bath in petrol (fuel), not diesel.
I will soak them and assemble in oil, or a little bit of WD40. AFAIK priming the engine is now a must.
Working with 5 in batch (could not stole more tupperware boxes from SWMBO
), so if somebody wants pictures, let me know. Is there any home garage mechanic procedure to check/proove that hidro lifters are okay?
Any advices are welcome...
Greetings!

Okay guys, all 16 lifters soaking in petrol!
They were full of crud at the bottom piece in front of spring, ball valve bearly visible.
Picture of half washed during teardown... I hope that I wont get tractor diesel sound as an award for doing this nasty job :-(
I have some 10-40 semi synthetic in garage, which I can use after soaking and additionally cleaning all lifter parts with toothbrush.
Which one is safer/better: shall I just oilbath and lube them when assembling or assemble them actually submerged in oil?
I plan to prime engine eitherway before any attempt of starting.
Attachments

Thanks. As I unfortunately cant remove oil pan in this garage, and I am scared to use seafoam, this is what I plan with oil changes:Yes do not run the engine with the oil that is in it now.
Prime and start with fresh stuff.
Lifters are all clean, nicely lubed, oil was dripping out 2 days, I flushed thru with 1qt of fresh new oil with both plugs open thru all drain holes in valve train and lifter valley. Old wix filter out, full of crap, almost nothing went out :-(
Step1: Bought cheapo supermarket Shell Helix HX7 10w40 semi and cheapo oil filter. Plan is to crank engine, warmup and immediately drain hot oil due to possible crap felt in (I was very careful, but...). This I poured in hours ago. Still need to assemble intakes and covers.
Step2: German affordable brand Pantherol 5w-30 Synth and k&n ps-3001 filter. Run few hundred miles or when it becomes darker - drain. Point is again - to drain a possible released sludge and give the engine clean synth start, as I dont know what was that sticky mess inside from PO (apparently not good)
Step3: Final, Mobil1 ESP 5w-30 Synth plus k&n ps-3001.
I hope that engine will survive and run okay until step3. Let's see how it will go thru it and (I wish) possibly run without further issues...
Sounds good, safe&sound?
Question: Shall I just torque tighten rocker arms (18-25ft lbs) back as the engine was working or shall I do the rocker procedure with turning the engine and checking pushrods?
Everything is stock...
Thank You in advance for suggestions and greetings!

Done.You want to do the rockers with the valves on the base circle, if not you could bend the push rod or/and get a bad torque reading.
Maybe wrong... I still did not prime the engine, lifters are only slightly oiled on assembly, not full of oil. My mechanic told me it is the reason of following:
Took a look at YouTube 302 valve adjustment and went wrenching... Set #1 to tdc and tightened... Screw went really hard but pushrod is still turning between fingers, not beeing tight...
I set torque, 20 - loose, 22 - loose, 24 - loose, 25 - loose. I stopped here and tightened all rockarms to upper specified value. Pushrod and rockers have nice play and are loose in base circle.... called mechanic, told me due to empty lifters? He was not convincing when I told him I went to 25 ft lb, but said 'okay'.
You guys here have far more experience with 302... Shall I repeat process after priming engine and lifters with oil back to 20, or should 25 ft-lb be okay or safe?
Thank You.
Did you pour oil on the rockers before you torqued em down?
I can't say if it will be ok, I was not there to witness but I'd send it and see what happens.
After priming the engine of course.
Yap, valvetrain was soaked before any tightening. I also poured initial oil thru valvetrain and all the drain holes the day before.
As You state, I am leaning to solution to prime and redo rockers...
BUT, I have trouble finding proper priming tool to reach shaft, and there is fear of wrench extensions falling in, no matter how good I duct tape....
Uff, done for 2nd and 3rd time...thank You for suggestions @General karthief !Get a tool to do it, some pull the plugs and crank the engine to prime it but I don't recommend that for a new build.
I work in cutting tool production company, so I got steel rod 18" and we used induction brazing to weld 1/4 to hex adapter with silver wire. Sandblasted, painted, pro work... but when I came home... damn adapter OD is too wide to fit in bottom hole. Ouch :-(.
Will grind it for future needs... BTW See pictures of sharp looking unfunctional tool
Eitherway, while determined to do it I pulled my balls and primed engine with wrenching extensions powertaped together. Valvetrain soaked.
Went with rockers... positioned #1 (exhaust just lowered and intake starting to lift), adjusted #6 (with #1 on described #6 is on base circle), next pos #3 and adjust #5... etc following firing order and sister cylinders... In between cranks I primed oil few seconds on each turn.
Loosed rocker, slowly tightening while spinning pushrod until resistance felt. Stop. Skipped 1/4 or 1/2 turn, just continued with wrentch set to 21ft-lb torque. All rocker screws turned between 1/4 and 1/2 turns until click by this method.
Looks good to me. As completed, done another batch with re-checking torque. Pass. Cranking pr manually turning was the most time consuming as cooler is not removed :-(
Interesting part:
The other day I watched guy cranking engine with no particular order and tightening all pretty loose rockers (no torque wrench) talking he's doing it for 16 years no objections or problems....
As I had 10 minutes free, from curiosity I checked this (no tightening of course, just crank-check pushrods circling). There were no 'loose' pushrods, but You can rotate them between fingers when valve is closed. As I prime oil they get more harder, and You need to compress teeths to rotate pushrod
.Does this mean that You actually cant really adjust lash with dry lifters? :-/
I also have a feeling when wrenching that if I would like or try to tighten rockers screws for another 1/2 turn I could strip them :-(.
Now let's hope that engine will start and initial possible ticking will go away as oil starts to circulate. ...so help me God..
Attachments


A little bit work on looks in progress...
Sandblasted water pipes and vacuum splitter, got a nice 500°C matt coat...
What You guys use on things like egr, iab, fpr to stay shiny? I am just polishing for now...
Sandblasted water pipes and vacuum splitter, got a nice 500°C matt coat...
What You guys use on things like egr, iab, fpr to stay shiny? I am just polishing for now...
Attachments

Update. Working on small things taking alotta time...
Fuel rails polished, injector harness re-wrapped (plastic and tesa tape combo), painted ugly dizzy body, prepared upper intake silver bolts to be zinc galvanized, etc...
Upper engine should look like from factory. I just hope it will run :-/
Fuel rails polished, injector harness re-wrapped (plastic and tesa tape combo), painted ugly dizzy body, prepared upper intake silver bolts to be zinc galvanized, etc...
Upper engine should look like from factory. I just hope it will run :-/
Attachments


At #1 compression strike felt on finger, with plastic straw set to TDC. Locked on 0 on balancer (good setup PO or factory). Waiting to be stabbedHow are you at stabbing the dizzy. Ha ha.thats all that matters
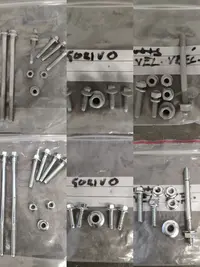
Few pics of upper screws and bolts lightly sandblasted and galvanized. Inch bolts are hard to get here....(as metric in US) so I have additional work :-/
Attachments
Assembled on saturday.
Run few dozen minutes on semi-synth 10-40. Went out pretty dirty if You count running time.
Poured in synth 5-30 with k&n today. Kitten is pouring...I hope it will continue so
Still a lot to do, but real progress is visible (for now, every evening is a new day) if You peek under upper intake
Thnx for suggestions everyone!!!
List is long, but in short before spring I see: -AOD service (oil & filter),
-differential oil change (also has a little bit slack/play),
-suspension bushings toast (checked on strecher),
-engine mounts are toast and
-a/c system check and first of all a loud pulley/bearing in clutch change
This baby is pretty much stock, but was neglected by PO/PO's.
If anyone has suggestions what to priorize and check, kindly please let me know
Attachments


Add. "metallic chirping" was probbably a tensioner pulley bearing. It went south. Yesterday I put in new skf 6203 and since then sound did not repeat (yet). Maybe, it's solved.
From other pulleys, as mentioned above AC clutch is grinding a lot... After fixing engine and tensioner bearing, maybe it is a most distinctable alien sound on idle....
From other pulleys, as mentioned above AC clutch is grinding a lot... After fixing engine and tensioner bearing, maybe it is a most distinctable alien sound on idle....
I am having a hard time following. Did you start it ?? Kitten is pouring, and ac clutch grinding . Is it running.
I am having a hard time following. Did you start it ?? Kitten is pouring, and ac clutch grinding . Is it running.
Hey, of course. Runnin' awesome, kitten PURRS (autocorrect, sorry). "It's aliiiiveeee!!!"
-KOEO 87 (need to fix fuel pump relay bypass)
-KOER 94 (air pump bypassed on belt)
-3 in row balance tests result 9
No leaks for now with full synthetics 5w-30. (fingers crossed).
BUT I can't (or won't if You wish) test drive due to a high humidity, fog and salt on wet roads here.
AC clutch is not awfully grinding (yet), but with belt off You can hear trouble developing inside when You spin it. If You bring Your ear closer when belt on You will hear it. Few feets away it blends with engine/exhaust noise... I suppose it will get only worse.
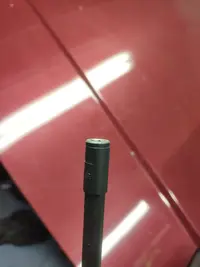
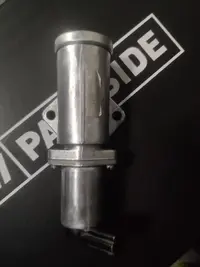
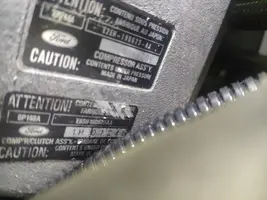
I attached picture: It should be a 6P148A if I'm correct and I should get 5001KFF or SKF AC2 (Rockauto)?
Attachments
One thing leads to another they say :-/
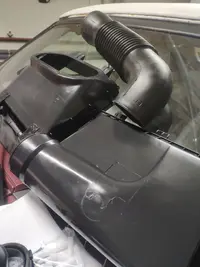
I repaired (as a temporary seal) some surface rust around airbox. Anticorrosion acid, then cans as follow: prime, paint (not mixed, ral3003) and clear coat. I hope it wont flank, thoose can/spray paints are always a gamble.
Restored some parts in the way (Ac wot relay, airboxes, seals, airtube).
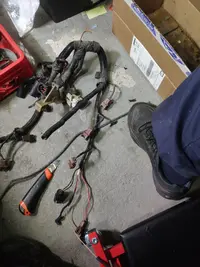
Currently I am removing main wire harness to renew sleeves/tubes. Its all hard and cracking. Injector harness was sucessful project, so I am processing main also.
QUESTION:
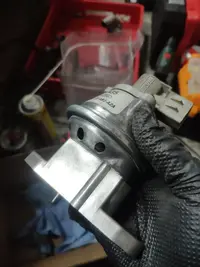
I think I may have found a part of the fuel pump bypass (my FP relay is missing, but car is running). I must find the other side, but does anybody from experience maybe have a clue from wire location I found:
Bypass wire pierced to right (looking from front of the car) wire of ignition coil connector. It is going thru firewall to drivers side... Still must find where to.....
Wire leading to ignition coil gives me an idea that maybe EEC relay is shot and bypassed?? Luckily I have brand new FP and EEC relays waiting
I repaired (as a temporary seal) some surface rust around airbox. Anticorrosion acid, then cans as follow: prime, paint (not mixed, ral3003) and clear coat. I hope it wont flank, thoose can/spray paints are always a gamble.
Restored some parts in the way (Ac wot relay, airboxes, seals, airtube).
Currently I am removing main wire harness to renew sleeves/tubes. Its all hard and cracking. Injector harness was sucessful project, so I am processing main also.
QUESTION:
I think I may have found a part of the fuel pump bypass (my FP relay is missing, but car is running). I must find the other side, but does anybody from experience maybe have a clue from wire location I found:
Bypass wire pierced to right (looking from front of the car) wire of ignition coil connector. It is going thru firewall to drivers side... Still must find where to.....
Wire leading to ignition coil gives me an idea that maybe EEC relay is shot and bypassed?? Luckily I have brand new FP and EEC relays waiting
Attachments
-
 IMG_20201219_113106.webp259.1 KB · Views: 190
 -
 IMG_20201218_175412.webp139.6 KB · Views: 208
 -
 IMG_20201218_180813.webp129.4 KB · Views: 183
 -
 IMG_20201218_175406.webp129.1 KB · Views: 193
 -
 IMG_20201218_134338.webp122.5 KB · Views: 185
 -
 IMG_20201216_080611.webp144 KB · Views: 188
 -
 IMG_20201216_080607.webp257.1 KB · Views: 187
Similar threads
- Replies
- 12
- Views
- 290
- Replies
- 24
- Views
- 716
- Replies
- 4
- Views
- 210
- Replies
- 32
- Views
- 1K