I thought I would share my personal experiences chasing the dreaded surging idle problem. I’ll first disclose that I’m by no means an expert or professional mechanic. I turn a wrench as a hobby and leverage the skills and talents of many folks on this board to steer me in the right direction. I can honestly say after close to 3 years of chipping away periodically at night and weekends here and there, I finally fixed my idle problems AND got rid of Codes 41 and 91!

I’ve gone down many, many rabbit holes and replaced many parts I probably didn’t necessarily need to. However, I’m just going to focus on the areas where I found problems which ultimately led to me fixing the problem.

Issue:

Hanging idle when decelerating, rev the car up when sitting idle and takes a while for the RMPs to come back down. Car also didn’t idle smooth. Sometimes high and sometimes low. Also had codes 41 and 91 (running lean) which caused my gas mileage to plummet. Not a huge deal since this is a weekend car, but was annoying.

Problem later turned into stumbling at idle when coming to a stop

Actions:

I started with the surging idle checklist. Like I mentioned before, I’m only going to share what worked, not all the parts I changed and tweaks I made.

1. Vacuum leaks

Let me start off by staying don’t waste your time with carb cleaner, spraying oil, or using propane to detect vac leaks. Unless you specifically know where your problem is, this is a huge waste of time. You’ll never hit all the areas successfully where a vac leak could occur and you’ll forever be getting responses from people telling you that you have a vac leak based on your symptoms. Might as well do it right and rule it out completely.​

Borrow, rent or build an emissions smoke detection machine. I had the benefit of borrowing a snap-on smoke machine from a mechanic friend. Worked great! First round I identified a cracked upper intake plenum. The back bolt must have been tightened too tight by previous owner and snapped the intake in 3 pieces. Huge leak! Post replacing the intake, I borrowed the machine again and found a leaky EGR (I later found this to be normal- this particular EGR has what’s called a “metered” leak). I replaced it anyway. And I found the butterfly shaft on my TB had a small leak at the bottom. Although probably not a huge deal, I had a brand new TB already and just swapped it out. At this point I decided to make my own smoke machine which is pretty easy to do (check on the interweb for examples). No more leaks detected!​

Using a smoke machine, all the leaks I found took less than 2 minutes to identify and it showed me exactly where the issue was. No way could I have accomplished this any other way.​

Even though I solved all my vac leak problems, I was still pulling codes 41 and 91. My idle was much better, but I now created a problem where the car would stumble pretty bad when coming to a stop. Car would struggle to stay running for about 10 seconds, then idle fine again. After ruling out a number of things and based on similar symptoms from another mustang owner, I went after the TAB/TAD.

2. TAB/TAD (need to be added to the master surging idle checklist)

I read multiple posts and even heard from a Ford mechanic that the TAB/TAD have nothing to do with idle….this is wrong!​

I plugged the TAB vac lines with golf tees and codes 41 and 91 disappeared! I did pull 44 and 94 which was expected. Car ran great! I know it’s easy to pull the smog system, but I prefer to keep it intact at least for now.​

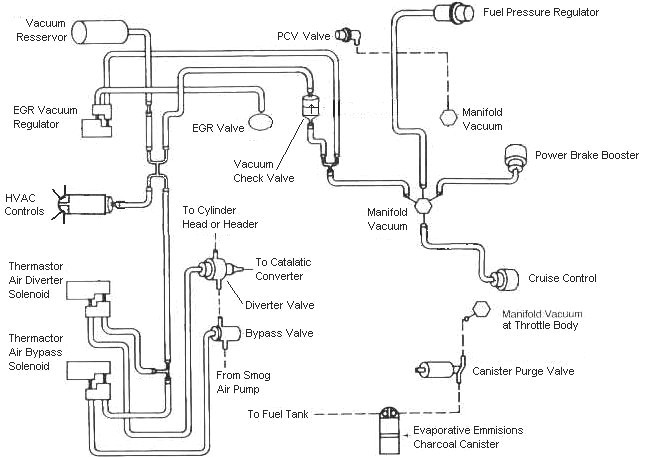
After closely inspecting the vac lines going to and from the TAB/TAD, I noticed my vac lines were backwards.​

I switched them around correctly and no more code 44 and 94 and 41 and 91 did not return!​

I did however throw a new code- #46​

3. Diverter Valve

Long story short, after swapping TAB/TADs and bypass and diverter valves trying to trouble shoot this new code 46, the problem ended up being the diverter valve tube that connects to the Cats. Mine tube was missing and the bottom of the diverted valve was capped.​

When the valve opened attempting to push air to the cats, but was completely blocked that must have been causing code 46. Nowhere for the air to go.​

I uncapped the bottom of the diverter valve and let the air blow into the atmosphere for now. I did pick up a new tube to connect the diverter to the cats, but haven’t put it on yet.​

So I’m code free and car runs great!

Lots of people helped steer my in the right direction and gave advise on how things are supposed to work. Hopefully this post will help someone else down the road. My first issue is likely common, but I’m sure not many will run into the second and third. Previous owner didn’t have excellent attention to detail!
 
  • Like
Reactions: 1 user
  • Sponsors (?)


The only codes my cars throwing is the evap purge solenoid because I deleted my canister. It still surges at idle with no consistancy and still has no power. How do I test the o2 sensors and fusible link to the o2 heater? Anyone have a schematic?
 
My car idles at 1300 when i set it at 900 and will surge inconsistently and eventually kill itself if you unplug the spout the idle comes down to 1000-1100 but will still surge at it even continues to surge with the IAC disconnected any ideas?
 
My car idles at 1300 when i set it at 900 and will surge inconsistently and eventually kill itself if you unplug the spout the idle comes down to 1000-1100 but will still surge at it even continues to surge with the IAC disconnected any ideas?
Go back and read the FIRST 2 posts on page 1. Do the checklist and don't skip around or pick and choose. You may miss exactly what you need to fix your problem.
 
Well guys I went through this entire checklist and im still comming up with nothing the my surge is random sometimes it steadies out and idles perfect sometimes it idles high and other times it just has a vary wide consistsnt surge it also seems to only really fluctuate when its warm when its cold it just idles high and the rpms vary minimally
 
@Foxybody95

Have you dumped the codes and fixed the codes that came up? That includes codes with the key on, engine off and key on, engine on.
I would like to see what codes you got...

Did you disconnect the IAC and see if you had surging?
 
Last edited:
@jrichker yes ive dumped codes the only codes that come up are for thr evap purg solinoid which indeleted and a code 11 and yes ive disconnected it the car just dies immediately and when i do force it to run sometimes it steadies out but then will eventually start to surge again
 
I did that went through the whole checklist
You may have done it, but can you get the engine to idle at 600-625 RPM with the IAC disconnected?
If not, you probably have mechanical problems.

What are the engine mods and what was the last thing you did before this problem started?
 
@jrichker yes once i get it running with the iac disconnected it can hold a steady idle but its not consistant when sometimes it will slowly start to surge again and i replaced my oil pump i did so without removing the motor i also replaced the distributor my original pump failed and spun the roll pin in the distributor shutting the car off so the motor never ran with no oil pressure i replaced them both car started right up ran great took it out for a test drive it was fine then started it the next day and this problem startrd that was months ago ive been chasing this problem ever since and my motor is a fully built 306 trick flow heads, E cam on 1.7 rockers 9.4:1 compression ratio
 
@Foxybody95

Here's some tips on the intake manifold removal and installation...

Tools: a good torque wrench is a must have item. A razor blade scraper that holds a single edge razor blade from Home Depot or Ace hardware is another handy thing. Get a Chilton or Haynes shop manual - you'll need it for the bolt torques and patterns. The intake manifold has an especially odd pattern. You'll need access to a timing light to set the timing after you re-stab the distributor. Look in the A/C repair section for the fuel line tools. They look like little plastic top hats. You will need the 1/2" & 5/8" ones. The hat shaped section goes on facing the large part of the coupling. Then you press hard on the brim until it forces the sleeve into the coupling and releases the spring. You may need someone to pull on the line while you press on the coupling. Put some motor oil on them when you put the line back together.

The A/C Compressor comes off with lines still connected. Mark all the electrical, smog and vacuum lines with tags to help you remember where to re-connect them. If you have a digital camera, take several pictures.

Whatever you do, don't skimp on cleaning the gasket surfaces. New gaskets need to seat against bare metal and not the residue left from the old gaskets in order to seal leak free. This is the most time consuming and tiresome part of the job. Look for little things that need to be replaced like the short hose from the thermostat hosing to the water pump, damaged vacuum lines and hose clamps that are rusted or broken.

Plan on cutting the thermostat to water pump hose, or removing the thermostat housing. Also plan on removing the distributor to get clearance to remove the intake manifold. Remove #1 spark plug, stick your finger in the spark plug hole and crank. When your finger gets air moving past it, stop cranking. Turn the engine until the timing marks line up with the pointer. Now you can pull the distributor out.

My favorite trick that saves time and effort is the stay in place gasket. Be sure that you scrape (don't use a wire brush) all the old gasket material off, then clean all the surfaces with acetone or MEK.

When the surfaces are clean, use weather strip adhesive on the head to manifold surface, and on the side of the gasket that mates to the head. Follow the instructions on the tube or can and when it gets tacky, press the gasket down on the head.

Clean the area where the rubber rails mount to the block in front and in the rear with more acetone or MEK and do the same trick with the weather strip adhesive that you did to the heads.

Coat the rubber seals and the gasket area around the water passages with lots of Blue Silicone gasket sealer and put it together. Wala! no leaks, and no gaskets that shifted out of place.

Get a tube of anti-seize and coat all the bolt threads and under the bolt heads. That will help insure even torque when you tighten the manifold bolts. Plan on re-torquing them a after a weeks worth of driving

Fuel injector seal kits with 2 O rings and a pintle cap (Borg-Warner P/N 274081) are available at Pep Boys auto parts. Cost is about $3 per kit. The pintle caps fit either injectors with a pin sticking out the injector end or 4 with more tiny holes in the injector end. The following are listed at the Borg-Warner site ( http://www.borg-warner.com ) as being resellers of Borg-Warner parts:

Parts Plus – Premium Auto Parts & Accessories or Auto Value or Pep Boys | Tires | Auto Repair & Service | Car Parts | Car Accessories or Federated Auto Parts

Most of the links above have store locators for find a store in your area.

Use motor oil on the O rings when you re-assemble them & everything will slide into place. The gasoline will wash away any excess oil that gets in the wrong places and it will burn up in the combustion chamber.

Consumable items:
Upper manifold gasket
Fel Pro 1250 or equal lower manifold gasket set.
Short formed hose between thermostat hosing and intake manifold
6 ft 7/64" or 1/8" vacuum hose
2 ft 1/2" heater hose
1 1/2 ft 5/8" heater hose
Blue Silicone sealer
ARP antiseize or equal for the bolts
4 each 3/4" hose clamps (spare item in case the old ones are bad)
4 each 1/2" hose clamps (spare item)


What can happen if you don’t use the stay in place gasket…

Ask Nicoleb3x3 about the intake gasket that slipped out of place and caused idle and vacuum leak problems that could not be seen or found by external examination. Spay everything with anything you have, and you won't find the leak...

http://www.gotstang.com/photodisplay.php?iid=111113
 
I replaced the upper manifld gasket when i did the oil pump i dont think i will have to take the lower off because I never touched the lower since the problem occured ill check my upper plenum gasket replace if necessary and ill get back to you thanks for the help
 
Check the vacuum lines on the bottom side of the lower intake manifold. Pay close attention to the large vacuum line that runs forward to the carbon canister solenoid valve. If you don't have a carbon canister, you need to plug or cap that line.

If you disconnected the carbon canister and failed to properly cap the vacuum line coming from under the upper intake manifold, you will have problems. You will also have problems if the remaining hose coming from under the upper intake manifold or caps for the vacuum line are sucking air.

Charcoal canister plumbing - one 3/8" tube from the bottom of the upper manifold to the rubber hose. Rubber hose connects to one side of the canister solenoid valve. Other side of the solenoid valve connects to one side of the canister. The other side of the canister connects to a rubber hose that connects to a line that goes all the way back to the gas tank. There is an electrical connector coming from the passenger side injector harness near #1 injector that plugs into the canister solenoid valve. It's purpose is to vent the gas tank. The solenoid valve opens at cruse to provide some extra fuel. The canister is normally mounted on the passenger side frame rail near the smog pump pulley.

attachment.php


It does not weigh but a pound or so and helps richen up the cruse mixture. It draws no HP & keeps the car from smelling like gasoline in a closed garage. So with all these good things and no bad ones, why not hook it up & use it?


The purge valve solenoid connector is a dangling wire that is near the ECT sensor and oil filler on the passenger side rocker cover. The actual solenoid valve is down next to the carbon canister. There is about 12"-16" of wire that runs parallel to the canister vent hose that comes off the bottom side of the upper intake manifold. That hose connects one port of the solenoid valve; the other port connects to the carbon canister.

The purge valve solenoid should be available at your local auto parts store.

Purge valve solenoid:
6


The carbon canister is normally mounted on the passenger side frame rail near the smog pump pulley.
Carbon Canister:
CP2000photo%20primary__ra_p.jpg


Diagrams courtesy of Tmoss & Stang&2birds

Vacuum diagram 89-93 Mustangs
mustangFoxFordVacuumDiagram.jpg


See the following website for some help from Tmoss (diagram designer) & Stang&2Birds (website host) for help on 88-95 wiring Mustang FAQ - Wiring & Engine Info Everyone should bookmark this site.

94-95 Mustang wiring diagrams
Mustang FAQ - Wiring & Engine Info

Complete computer, actuator & sensor wiring diagram for 91-93 Mass Air Mustangs
http://www.veryuseful.com/mustang/tech/engine/images/91-93_5.0_EEC_Wiring_Diagram.gif

Complete computer, actuator & sensor wiring diagram for 88-91 Mass Air Mustangs
http://www.veryuseful.com/mustang/tech/engine/images/88-91_5.0_EEC_Wiring_Diagram.gif

Ignition switch wiring
http://www.veryuseful.com/mustang/tech/engine/images/IgnitionSwitchWiring.gif

Fuel, alternator, A/C and ignition wiring
http://www.veryuseful.com/mustang/tech/engine/images/fuel-alt-links-ign-ac.gif

O2 sensor wiring harness
http://www.veryuseful.com/mustang/tech/engine/images/mustangO2Harness.gif

Vacuum diagram 89-93 Mustangs
http://www.veryuseful.com/mustang/tech/engine/images/mustangFoxFordVacuumDiagram.jpg

HVAC vacuum diagram
http://www.veryuseful.com/mustang/tech/engine/images/Mustang_AC_heat_vacuum_controls.gif

TFI module differences & pin out
http://www.veryuseful.com/mustang/tech/engine/images/TFI_5.0_comparison.gif

Fuse box layout
http://www.veryuseful.com/mustang/tech/engine/images/MustangFuseBox.gif

Mustang 5.0 Lights and Radio schematic, by TMoss:
http://www.veryuseful.com/mustang/tech/engine/images/mustangFoxLights-Radio_diag.gif

87-92 power window wiring
http://www.veryuseful.com/mustang/tech/engine/images/mustang87-92 PowerWindowWiring.gif

93 power window wiring
http://www.veryuseful.com/mustang/tech/engine/images/mustang93PowerWindows.gif

T5 Cutaway showing T5 internal parts
http://www.veryuseful.com/mustang/tech/engine/images/5_Speed_Cutaway_Illustrated.jpg

Visual comparison of the Ford Fuel Injectors, picture by TMoss:
http://www.veryuseful.com/mustang/tech/engine/images/Ford_Injector_Guide.jpg
 
@jrichker i replaced my upper plenum gasket torqued the plenum down started it and it seemed to run fine just idled a little high so i tried adjusting the idle and the moment i messed with the idle screw the thing went into a surging frenzy and killed itself