'88 GT Convertible - Croatia, Europe

  • Sponsors (?)


Oil wiping out bearings? What?
Yeah, I personally think like You about those pumps.
One 'official' source I remember is rockauto.com on all HV/HP parts - no comment, but:
Service Tip: Using a High Volume / High Pressure Oil Pump on an engine that has stock bearing tolerances can over-pressurize the oiling system and lead to rapid engine wear and damage

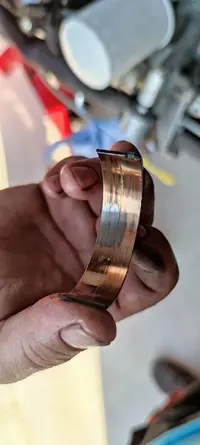
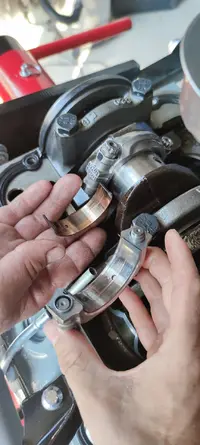
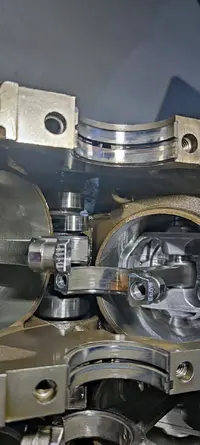
Something wonky with a rod bearing or cap.
Just a guess, I'm not a mechanic but I play one on line.
Close call. This is my assumption also.
Allthru plastigage showed 0,0015 to 0,002 clearance...catch this: my 1st time rod journals mic measure was -.0005 to -.0009 from mid -.010" diameter (2.1132 +/-0.0004").
According to that rod journals were ground too much, but plastigage made me believe I was wrong and not using micrometer correctly....
 
Compression test done on really cold engine (few days not runnin):
1 110psi
2 110psi
3 107psi
4 105psi
5 110psi
6 110psi
7 110psi
8 115psi
I expected more from moly rings and tight hypereutectic pistons, but they have only shy 300miles on them...
Maybe a fresh rebuild cold engine is not a good test?
Hence allthru low, numbers are within 10%.

Spark plugs look okay. Tip is burning by book (perfect), bottom at thread a bit oily #3, #4 and #7.

Intake PCV hoses (PCV valve to upper intake) contain a bit of engine oil.

No noticeable fluid leaks found up to now.
They are not likely fully seated yet. Keep looking.
 
Goddamn.
I have a good ear, but it was rod carnage not main....

Journal 4 is all messed up. Cylinders #3 and #4 eat upper rod bearing shell almost all copper, others only scratched....see pics.
My first mic measure of crank when I got it back was 0.002 to 0.004" below minimum on journal 3. That first one was correct I suppose, everything measured later was "adjusted" measure... I trusted machinist not myself.........

Mains are scratched, but not badly...oil is not so contaminated, only filter when ripped apart. Could I get away without a complete disassembly?

My plan is to get a new Eagle crank and new stock 0 bearings and slap them in hoping that cam did not chew copper......
Drill the heck with the cord drill while turning a new crank to get all possible left particles out.
Change that oil and then few fast changes 100,200 miles??

What would You guys do?
Take it all out for cleaning, cam, lifters or just slap new bottom?

Thnx...
 

Attachments

  • IMG_20220629_181147.jpg
    IMG_20220629_181147.jpg
    257.8 KB · Views: 49
  • IMG_20220629_180352.jpg
    IMG_20220629_180352.jpg
    148.8 KB · Views: 40
  • IMG_20220629_180338.jpg
    IMG_20220629_180338.jpg
    238.9 KB · Views: 39
  • IMG_20220629_180345.jpg
    IMG_20220629_180345.jpg
    155.9 KB · Views: 38
  • IMG_20220629_180336.jpg
    IMG_20220629_180336.jpg
    251.5 KB · Views: 43
  • IMG_20220629_164121.jpg
    IMG_20220629_164121.jpg
    351.5 KB · Views: 43
  • Sad
Reactions: 1 user
I’d be upset for a while and mull it over before deciding what to do.
Then I’d have the crank machined by a different shop and measure it myself. A new crank is not automatically a plug and play product.
Checking the cam and bearings is the least I would do there. Not replacing those bearings and the cam after sparkly oil would worry me.
 
  • Like
Reactions: 1 user
Those are called wiped out
Most likely from no oil pressure
Thank God you got to it before you spun a bearing and ruined the crank
Now those are witness marks!
And you did not have to run it long like you were worried about
Did the same thing to my Boss 302 in about 1984 when I put a Milodon 7 quart pan on it and did not get the oil pump shaft inserted in the oil pump correctly
What a pisser
Good luck
Remember 3rd times a charm

Don't worry too much about the metal in the engine
It'll just keep you up at night
Clean it out the best you can and let the new oil and filter do its job
Did not realize your crank was wiped out too, undersize? or chewed up?
That would explain the low oil pressure
You can have more clearance then the stinking book says
You want them loose if you want it to run
Too loose it blows up
Too tight it won't run
10k in machine work and parts on my first build
You are damn near there
Good luck
 
  • Like
Reactions: 1 user
Those are called wiped out
Most likely from no oil pressure
Thank God you got to it before you spun a bearing and ruined the crank
Now those are witness marks!
My mechanic told me I have a pretty good ear. I heard first time cylinder bore knock, second time thoose wiped beardings...
I would say the reason was rod journal #3 on crank was overground (journal too small ~0.002 to 0.006") and from beating there it made oil clearance so big it started to loose pressure on hot oil... from this point and copper all around went south...

I am 99% sure I will scrap this crank and take Eagle new (virgin) one. I don't have heart to go thru this again, I don't trust machinists here.........

Don't worry too much about the metal in the engine
It'll just keep you up at night
Clean it out the best you can and let the new oil and filter do its job
I was thinking the same about metal in engine. If camshaft got it like main bearings (only scratches) I will get away with it....

Did not realize your crank was wiped out too, undersize? or chewed up?
I mic'd crank after grinding to .010, it was too small on first measuring batch at rod journal 3 and 4.
After that I had trust issues with myself (who am I to question machinist???) and I "adjusted" micrometer to get measures in tolerance.
Insteresting, platsigage showed 0.015 to 0.020 clearance and I just "apparently confirmed" I don't know to mic.....
Should have slapped him with crank........ next time I will trust myself and first measureing result more.

10k in machine work and parts on my first build
You are damn near there
Good luck
It's not all about money, but confidence, pride, joy in work and time with kids and family lost....
I am about to buy a new crank also mainly cause I may lift my hands off that car in case of a next problem with this next rebuilt... I am simply not sure if I will have determination to tear down this motor for 4th time... all due to some machinist mistake.

I know new crank is not plug'n'play but I trust more to chinese in this dissapointed condition...rememer - engine failed due to one of the two things I did not do by myself.... $#T%R$%T"#$$!"$!"#
 
  • Like
Reactions: 1 user
This is the third time I have read about poor machine shop work causing a wiped out crank, it's an epidemic.
Just for fun (not that it really is) look at the oil holes in the rod/main bearing area, did they cut back the oil holes (round off the opening) , this was done way back for helping oil the bearing, racers found that the opening being sharp it would 'shear' the oil from the bearing (not sure if I'm explaining correctly) rounding up the opening let the oil flow onto the bearing surface better and most really savvy engine builders would cut a trough on the trailing edge of the hole. Old racer engine building techniques that I thought became a standard.
 
  • Like
Reactions: 1 user
Absolutely General
Those oil holes should / need to be chamfered
On the new Eagle crank they should be
They told us in screwell that machinists cannot hit the tolerances necessary to rebuild todays engines
They were talking about the 4.6 and the 5.4 at the time
That leetle 5.0 should be no problem for a good machinist unless their tooling is worn out
 
  • Like
Reactions: 1 users
Howdy!

Got some motivation so I used it today to get the crank out:

Good news is that cylinder walls and cam bearings are okay (a bit shiny/polished at bottom side).
Aside from a bit worn front side of cam hold plate (like chain sprocket was not 100% flat), engine looks like new.

Luckily, I saw no bigger particles in crankcase.
Cam has few lobes scratched a bit (visible on pictures), but I think it will be okay.
No bigger particles in bearings also, no damage to crank journals....oil pump, shaft and pickup tube look okay.

How did this carnage happen?
Why are mains scratched and only three rod bearings worn to copper on upper side? Especially #3,4 and 5...
 

Attachments

  • IMG_20220707_204458.jpg
    IMG_20220707_204458.jpg
    260.9 KB · Views: 47
  • IMG_20220707_204506.jpg
    IMG_20220707_204506.jpg
    266.8 KB · Views: 47
  • IMG_20220707_204510.jpg
    IMG_20220707_204510.jpg
    283.7 KB · Views: 45
  • IMG_20220707_204532.jpg
    IMG_20220707_204532.jpg
    273.3 KB · Views: 45
  • IMG_20220707_204552.jpg
    IMG_20220707_204552.jpg
    291.8 KB · Views: 39
  • IMG_20220707_204649.jpg
    IMG_20220707_204649.jpg
    134 KB · Views: 34
  • IMG_20220707_204727.jpg
    IMG_20220707_204727.jpg
    122.5 KB · Views: 44
  • IMG_20220707_205723.jpg
    IMG_20220707_205723.jpg
    131.3 KB · Views: 47
That last picture is cam bearing. Wear is visible only at bottom side, upper side is brand new.
Quick google throw me to this topic, would say very similiar to my story, but cam bearings are not even close to that one.
HERE IS THE LINK

300 miles was done on this rebuild before rod started to knock.
 
Last edited:
Okay guys, changed CAM bearings. I don't want to cry in 200 miles due to cam bearings....

Today I measured crank twice.... it has measures all over the place, but is not so bad...
Would it cause #3 and #4 bearing damage I don't know.... maybe it wass oiling issue afterall...
Orange is too tight, red is overground.

New Eagle crank is at balancing shop, ARP main bolts and oil pump shaft arrived today.
I polished cam with 2000 grit. Will wash engine as much as I can with lacquer thinner and brake clean (heads are not off, pistons in bores)
Wish me good luck... (or I will burn this thing)
 

Attachments

  • crank.jpg
    crank.jpg
    111 KB · Views: 37
  • Like
Reactions: 1 users
Hi guys!

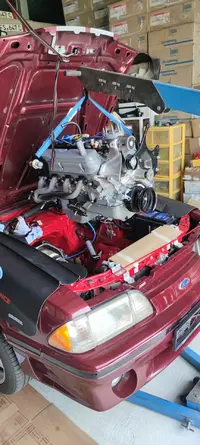
So, the parts arrived from Rockauto and CJPony parts... after cleaning the hell out of back engine and AOD, I may have found out oil leak source.... surprise, surprise - back side of valve covers.
TBH You could never really see them without passanger side engine chain support bracket away from #4 exhaust port, and also exhaust manufold and AOD dipstick plus SMOG downpipe away contributed to nice piece of engine visible and accessable to analyze leak source....

I just hope that knocking was from aluminum bellhousing / engine plate and therefore proceed with assembly:
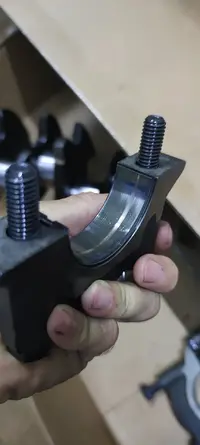
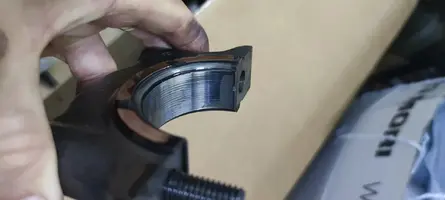
- I changed rear main seal, wasn't leaking much but it was stearing in my face... method I used was a really really thin layer of black RTV on outside perimeter, white grease inside on contact with crank flange... we will see the results
- I don't dare to take out the torque converter (read some scary stories about people not setting them it properly all the way in and destroying a pump), so I just cleaned front of TC and bellhousing, also a pivot and crank hole from rust and... shall I lube it with a bit of red hi-temp gearing/joints lube to avoid rust in future?
- aluminum bellhosing / engine plate from CJ Pony parts arrived but I had some test-fit issues with dowel pins (does not fit due to too wide dowel pin holes distance), so I need to ream the holes a bit to outside and as I read on reviews I am not the only one...
- for a flexplate I got nice ARP 12pt bolts which have thinner head than stock ones, and I hope TC won't touch them anymore as it did the OEM ones...
- I also got some ARP stainless bellhousing bolts, but unfortunately they are only 1.500" long. OEM ones are longer so I am affraid to use them...
- Then I got stuck with new flexplate....


I took Pioneer FRA-214HD heavy duty flexplate due to corrosion protection.

Unfortuntely (and luckily) I made a test-fit of a plate to TC, and the studs are a tad more to outside than holes on brand new flexplate!!
I would roughly say that the flexplate is ~11.45" and TC studs 11.5".
Yes, I turned it several times around and we are talking about the torque converter studs to the flexplate holes.
Just in order to explain how small the difference is: I can get the flexplate on converter with two studs in, third one on the way and fourth has problems... guarantee You that a rubber mallet would get the fourth stud in if I would be crazy enough to hit the plate towards TC, but there is 99% danger or chance of stripping a TC bolt...

Only soltion is using die grinding/reamer to carefully extend all four flexplate holes a little bit (0.5mm or like 0.02") to outside... anybody been there, done it?
Or shall I just use an old faitful 32 year old OEM flexplate... ?


Thnx...
this is probably a dumb question but is there a way to do a rear main seal without going to crazy like pulling motor and trans
 
I would use the old flexplate if the ring gear teeth are in good shape
If not, die grinding the new flex plate bolt holes is no trouble
Mattys91gt, The rear main is a full circle on yours, Means the trans and flywheel/ flexplate must be removed to replace it
 
I would use the old flexplate if the ring gear teeth are in good shape
If not, die grinding the new flex plate bolt holes is no trouble
Mattys91gt, The rear main is a full circle on yours, Means the trans and flywheel/ flexplate must be removed to replace it
ya I figured it was since it's the aod I'll have to have the guy who rebuilt the transmission have a look at it