Build Thread My Never Ending 89 Notch Thread

If I was home I would shoot you some pictures, but I've done two intakes with it and still love the texture. Only problem with the truck is that I don't fear rain. It results in water spots if they get kicked up onto the hot intake. The explorer intake I did never touched water and looked great. I sold the car, but regret not painting the polished valve covers. Yours look great.

I did find the photo posted on here. Looks shiny from a distance, but crinkled up close.

http://www.stangnet.com/mustang-forums/attachments/20110625133633-1-jpg.141769/
 
Last edited:
  • Like
Reactions: TOOLOW91
Is that the VHT wrinkle paint that requires a three step oven cure to properly harden the paint after it's initially dry?
That is correct I shot them At work with no oven avail . Then let them sit in the sun for 3 days on my kitchen table


Sent from my iPhone using my fingers while my auto correct makes me seem illiterate
 
Where did you get those? Ive been searching for black one with no luck. Im trying not to put blue emblems back on my car.
Are you on Instagram by any chance ? I had them made and the person who made them basically does it though Instagram . They were not cheap either but deff would be worth it for a car with killer paint like yours


Sent from my iPhone using my fingers while my auto correct makes me seem illiterate
 
Send me the guys Instagram info. I'll join just soni can get the emblems. LoL! Are they overlays or what? Kind of hard to tell in the picture.
Over lays . Very very high quality
ImageUploadedByTapatalk1445271156.989567.webp


His name on Instagram is rebadgedesign


Sent from my iPhone using my fingers while my auto correct makes me seem illiterate
 
  • Like
Reactions: 84Ttop and liljoe07
So today's fun goes something like this . I got the covers all ready to go on extra line and fittings . Fiddle with the drivers side after getting it down move over to pass side and bang doesn't clear the power pipe .

Now I love these damn covers . But honestly I am just so tired of going nuts modifying that I'm not ready to cut them up and make it work .

So my new plan goes as follows . Shorten up pass side line to meet where the breather hole is and have a 10an fitting welded in it . Then use my old efi cover with no hole and weld a bung out of the front cuz the breather hole will not clear the intake if a fitting was welded in on the driver side cause of my intake .

Also replaced my bluish 6k headlights for 5k after the pass side ballast took a. Dump I bought another kit and took car of the that .

Blower drain back line kept seeping oil between the fittings I used for it even after I re did them once . So I orderd aero quip fittings for it and took care of that tonight hopefully that solves that issue as well .

The start of the valve covers . Was loving them too
ImageUploadedByTapatalk1445389957.801778.webp


ImageUploadedByTapatalk1445389766.297831.webp
then this .


ImageUploadedByTapatalk1445389896.761568.webp


New fitting will go as follows with a 180 degree fitting in it .
Other side will use the carb style and fitting will go where the round breather hole is

Sent from my iPhone using my fingers while my auto correct makes me seem illiterate
 

Attachments

  • ImageUploadedByTapatalk1445389844.641652.webp
    ImageUploadedByTapatalk1445389844.641652.webp
    40.9 KB · Views: 135
  • Like
Reactions: stangboy
Those covers do look sick! Or should I say cover?:) But I like the other ones also. You're making me think about using that paint on mine...:thinking:
Yeah I wish I could've made them work but things are way to tight in there with them . So back to the other covers with fittings added


Sent from my iPhone using my fingers while my auto correct makes me seem illiterate
 
a Hammer would make it fit...

:D :runaway:


Lol
Lol trying to keep it half way nice and I wouldn't want to ruin the honesty they are awesome covers . Going on my buddy Scott's car.
ImageUploadedByTapatalk1445397762.462566.webp


Lines already trimmed for this setup . Other line for d/s is cut and ready to go just waiting on the 180 fitting . And 2 alum fitting so we can weld this stuff in


Sent from my iPhone using my fingers while my auto correct makes me seem illiterate
 
Last edited:
Semi prepped for the welder . Let him drille the hole on the driver side one I just took the paint off for him to weld on it .
ImageUploadedByTapatalk1445463023.586666.webp
ImageUploadedByTapatalk1445463031.804383.webp


Sent from my iPhone using my fingers while my auto correct makes me seem illiterate
 
  • Like
Reactions: stangboy
Figure I'll mask just the area where he welds on the d/s one and crinkle it . And call it a day . Won't be able to notice esp that it is behind the ac compressor


Sent from my iPhone using my fingers while my auto correct makes me seem illiterate
 
ImageUploadedByTapatalk1445955904.427044.webp


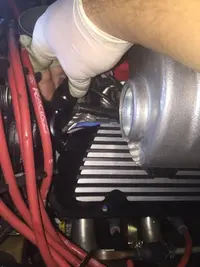
One side easy as pie . The other not so much . Right now there's a few options . Problem is when it was welded he went to the inner most part of where I took the paint off .

In hindsight I should've went on the back of this one but its to late at this point . I ordered a hard 90 and a hard 45 adapter for that side . Also a few fittings . If that idea don't work I ordered a ac delete pulley . If and when I get a round to re installing it id deal with it then .

I crushed the fitting in my vice just to see how much it would take to make it fit . Massaging would've been ok with me but this is too much .
ImageUploadedByTapatalk1445956747.963908.webp


Sent from my iPhone using my fingers while my auto correct makes me seem illiterate
 
  • Like
Reactions: stangboy