Project Resto - Supercharged 1992 GT 'Vert

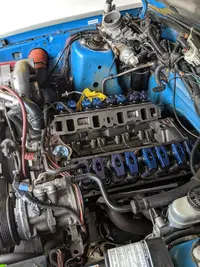
Going to be putting the heads back on this weekend. I am doing it solo. I am going to have to Mann up on dropping the heads in softly and precisely.

I could go buy an engine hoist but I am not sure if that would help me enough to justify the cost or help me at all period.

Headers are still on and it's tight quarters.

Gunna hand thread a few studs in and with the dowl pins and gasket and drop that puppy in.
 
  • Sponsors (?)


I did heads on my 89 gt on the side of the street. Took maybe 5 or 6 hours start to finish. Back then i just used a razor with light oil ro take the head gasket material off. It was graphite type stuff. The headers stayed in the car. I used rubber bungies to to hold them out of the way. ARP studs were a installed.

You'll be fine just wipe as much crapola out of the cylinders as you can.

A wire brush sheds wires...that's not anything you want in a cylinder either.

I've used a bunch of methods people now say don't use. I always cover the cylinders as much as possible.

Good luck, man !
 
In similar cases I like to shoot brake cleaner into the cylinders and quickly follow it up with compressed air to blow all the bits out. I'd then lube the cylinder walls with motor oil just before dropping the heads on. A little excess oil in the cylinders doesn't hurt as it gets burned off pretty quickly on start up.
 
  • Like
Reactions: 1 user
well that is what i needed to hear. I am going in the right direction. I did get some marvel mystery oil yesterday, and its sitting in the cylinder bores right now around the rings, then im taking a soft flexible tube and sucking out the debris, then i am hitting it with compressed air, then im going to turn the crank and make sure everything is out of the bored to the best of my ability. then its dropping heads on.

A co worker of mine is going to help me. probably going to remove hood so we can drop the heads on and have more room between the two of us. Will update tomorrow afternooon when its done.
 
  • Like
Reactions: 1 user
What is the top and bottom of a head gasket
 

Attachments

  • 15630457651835086001049569131958.jpg
    15630457651835086001049569131958.jpg
    282.5 KB · Views: 98
  • 15630457795264741423998470784149.jpg
    15630457795264741423998470784149.jpg
    295.5 KB · Views: 100
They are supposed to be the same. That’s why when they’re on each side correctly, it looks like one is upside down. But they’re not. Don’t look at which side is facing up. Just make sure the water jacket holes are in the back on both sides. Just like the dude in the video shows. And if they’re marked “front” keep that to the front. The word “front” will be facing up on one side, and facing down on the other.
 
Thanks for the help and that video. I remember watching that awhile back. But it's official the heads are back on and torqued down.

I had a co worker of mine come down and help me lay them in. We cleaned the cylinders out. I let them soak in Marvel mystery oil over night then we turned the crank and got each Piston at top dead center and we blew out all the gunk around the compression rings.

After we did that, put the motor back on TDC for cylinder one and we laid the heads on

One thing to note is we didn't actually put the studs in before hand.

We put the dowel pins in and then laid the gasket on the short block then dropped the head on the block then ran the studs in.

All in all, I couldn't have done it without the guidance and tips y'all provided. So now the major mile stone has been checked offf. Woooo! First head gasket job lol I hope the next one I gotta do is less learning
 

Attachments

  • 15630583546334997666212972917905.jpg
    15630583546334997666212972917905.jpg
    425 KB · Views: 97
  • Like
Reactions: 2 users
Two of the rocker arms are not square with the valve so I'm gunna loosen them up when I set the rods in and try and straighten them out.

This is how the passenger head is for reference.

Gunna go dig up these torque specs now and call it day.

Thanks again everyone. Best car thread I have ever been apart of
 

Attachments

  • 15630584158937580768695227145628.jpg
    15630584158937580768695227145628.jpg
    216.2 KB · Views: 101
And now begins trying to figure out how to properly set the valve lash.

So far I gather that you tighten down on the rocker arm stuff when that cylinder is at TDC. Then keep going until the push rod stops spinning, then tighten down 3/4 turn past that
 
Another simple way is following the base circle of cam rule. It goes like this. Especially easy if the intake is still off since you can see the lifters going up in the bore.

When either lifter for a specific cylinder is all the way up, to opposite lifter in that same cylinder must be on the base circle of the cam lobe. That rocker that goes with the lifter on the base circle is in proper position for adjustment. Adjust it and mark it with a piece of painter tape. Then look around the the lifter valley and your bound to find another lifter on the base circle of its lobe, adjust it, mark it. Rotate the engine a little to get other lifters in the positions, adjust and mark. Continue until all are adjusted.

Major rule is, when a lifter is all the way up, the other lifter for that cylinder is in position for adjustment.


Doing one cylinder at a time....ie cylinder one, rods are in, rockers are looseish.

Turns crank and what one lifter go up, the other goes all the down after cranking it around enough.

I forgot to look what is exhaust and intake.

But on cylinder one the left rod went in fine. I tightened until the pushrod stopped spinning then I did a half turn.

Did the one on right after turning the crank enough to make the lifters go up and down then I tightened down that rocker and the push rod is still spinning.
 
I'm stumped....I've triple checked. The intake push rod is still spinning and there is a smidge of lash I guess you would call it. As in after I tighten the rocker snugged down, there is still a small gap between the roller pin and top of valve. I can not get it to stop.

I notice there are shims under a little silver pedestal. If memory's serves me right, I see numbers of .030" and .060". I have mixture of both. Every rocker arm seems to have a different assortment of them but the first picture is shim stack on exhaust side.

Second is intake. Do I need to remove shims to get the lash out?
 

Attachments

  • 15631394511575412943060711303761.jpg
    15631394511575412943060711303761.jpg
    155.4 KB · Views: 98
  • 15631396114282379632319594598303.jpg
    15631396114282379632319594598303.jpg
    171.4 KB · Views: 85
This just hit me....but are GT40 heads apart of a 351 engine?

Rockers are E351...

And would machining these heads require me to use more shims if they removed material
 

Attachments

  • 15631398092084719523840965207651.jpg
    15631398092084719523840965207651.jpg
    208.9 KB · Views: 109
Whole new ball game now. I thought you were working with stud mount adjustable rockers. Those are pedestals you have in your hand. Completely different setup.

Did you gather these parts or was this a functioning assembly to begin with? Im trying to make sure you have all the right compatible parts.