'88 GT Convertible - Croatia, Europe

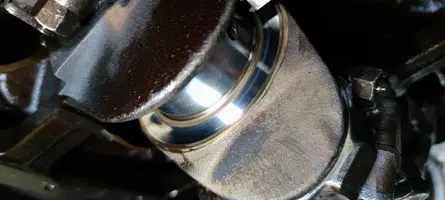
Okay, I would say journal 1 - cyl1&cyl5 are ready. I may get away with first one...

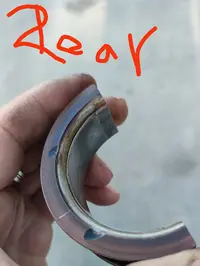
Used 1000 grit paper with WD40 and just a 30-40 soft turns with shoe string to loose lines slightly felt under fingernail.
Measure is 53.917mm or 2.1227" which is a hair below specification minimum (2.1228"). Perfectly round journal, not oval. I used a micron OD micrometer. Can't check con rod ID down there.... :-(
Forgot to measure con rod and journal width, but it will be hard to do it precise down there.....

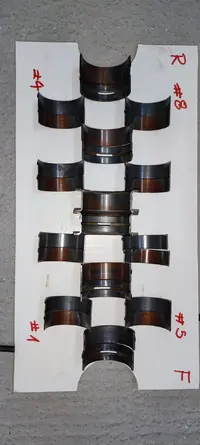
Waiting for assembly lube from mechanic, throw in new std bearings, tighten to ... middle 22 ft/lbs? (19-24 is spec)
And tomorrow we pray for journal 2...
 

Attachments

  • IMG_20210920_195723.jpg
    IMG_20210920_195723.jpg
    150.9 KB · Views: 43
  • IMG_20210920_200254.jpg
    IMG_20210920_200254.jpg
    145.2 KB · Views: 45
  • IMG_20210920_182228.jpg
    IMG_20210920_182228.jpg
    198.1 KB · Views: 42
  • Sponsors (?)


For doing this in resonable time You need a retirement and grown up kids...
Finally I got all con rod bearings put and went to main bearings, this is first one on picture with journal. Again the upper part got beaten well like on connection rods.
 

Attachments

  • IMG_20210924_230407.jpg
    IMG_20210924_230407.jpg
    386.1 KB · Views: 43
  • IMG_20210924_221228.jpg
    IMG_20210924_221228.jpg
    174.9 KB · Views: 40
  • IMG_20210924_221220.jpg
    IMG_20210924_221220.jpg
    108.7 KB · Views: 38
  • IMG_20210924_221624.jpg
    IMG_20210924_221624.jpg
    181.7 KB · Views: 42
Maybe worth to mention:
Rod cap #7 had some side slight grinding marks facing front towards crank and #8 facing back towards crank also.
I suppose a victims of axial crank play...and I hope I will get away with this...

But, why has this occured only on last pair of cylinders?
 

Attachments

  • IMG_20210924_200757.jpg
    IMG_20210924_200757.jpg
    207.4 KB · Views: 43
  • IMG_20210924_202134.jpg
    IMG_20210924_202134.jpg
    128.8 KB · Views: 36
  • IMG_20210924_202310.jpg
    IMG_20210924_202310.jpg
    272.4 KB · Views: 44
Looks like just new bearings to me
Piston skirt wear looks normal to me for 90k
You will need to pull the pistons out
Need to see picture of thrust surface of crank
That was the initial problem right?
Is the thrust bearing toast or the crank?
Measurements needed
Disassemble the oil pump and inspect rotor clearance
Seen a lot of these go back together and still knock
I am talking about new motors at the dealer that had less than 1000 miles
 
  • Like
Reactions: 1 user
@manicmechanic007 God bless Your words and that all of that work was not futile....

Bottom thrust is out:
Crank thrust looks okay to me, I will take pictures when I remove upper bearing.
I was surprised that front of lower bearing is worn as I expected back side wear .....
I got weekend ban from SWMBO, so to be continued next week :)
 

Attachments

  • IMG_20210925_184515.jpg
    IMG_20210925_184515.jpg
    275.8 KB · Views: 37
  • IMG_20210925_184539.jpg
    IMG_20210925_184539.jpg
    280.6 KB · Views: 40
  • IMG_20210925_175635.jpg
    IMG_20210925_175635.jpg
    127.8 KB · Views: 35
  • IMG_20210925_184451.jpg
    IMG_20210925_184451.jpg
    182 KB · Views: 43
  • IMG_20210925_184430.jpg
    IMG_20210925_184430.jpg
    203.6 KB · Views: 38
  • Like
Reactions: 1 user
Thrust bearing journal after 1000-grit treatment.

Looks like it will hold to me...
With new thrust bearing inserted and fingertight cap, there is absolutely less crank play....

The question remains why it was the front of thrust bearing worn? Using impact when changing HB?

Question: on last cap there is a rubber seal (rear main). Do You put some thin layer of RTV there?
 

Attachments

  • IMG_20210927_202230.jpg
    IMG_20210927_202230.jpg
    196 KB · Views: 36
  • IMG_20210927_202219.jpg
    IMG_20210927_202219.jpg
    215.7 KB · Views: 46
snovac,
Not too concerned about the location of the wear is on the thrust bearing
As you probably know when you press on the clutch or engage an automatic
The crank moves forward and wears the thrust bearing rear surface
You may not know because it usually only happens road or drag racing
At high rpm an externally balanced crank goes "S" shaped
That's what wears the #3 thrust on a Small Block Ford all screwy
I have never seen a perfect match on the wear surfaces
I used to chock it up to misalignment of the halves
The early two piece rear main seals were cocked about 1/4 inch and had a small dab of silicone where they joined together
The late one piece seals go in with no sealer
I have seen sealer Rubber not silicone on some GM applications 4.3 for example
I am also proud of GM for putting a large chunk of foam in the cavity back behind the rear main on some models (4.3 Blazer) et al.
Gets them out of base warranty with no leak
I am concerned about your crank
Put a new thrust bearing half in your crank and measure the side clearance
2 to 6 thou is roughly the spec 10 is too much and 15 or more will throw or bend a rod

Your crank is probably ok by the looks of your thrust bearing
Measure the clearance with the old bearing too
 
  • Like
  • Winner
Reactions: 1 users
2 to 6 thou is roughly the spec 10 is too much and 15 or more will throw or bend a rod
Crank set to max forward with long screwdriver:
6 thou I can squeeze in with new bearing on passenger side, drivers side is a bit tighter... 4 thou is a bit loose but I don't have feelers between 0,10 and 0,15mm to have exact measure.
Old bearing is out already, so I can't test with it unfortunately...
 
@manicmechanic007 God bless your words, and with a little bit luck...it could run!

Allright, all in.
Bearings changed, rod and main.
-Thrust bearing to crank side clearance is 0.006"
-Con rod side play is 0.015"
All bearings were worn to copper.
First main journal had a strange, embossed-like middle where the upper part bearing oiling groove aligns. It's not big, but You certainly can slightly feel it under finger.

Was this all a source of knock... We will know soon.
 

Attachments

  • IMG_20210929_204705.jpg
    IMG_20210929_204705.jpg
    218.1 KB · Views: 41
  • IMG_20210929_204654.jpg
    IMG_20210929_204654.jpg
    239.1 KB · Views: 40
Hillbilly rebuild done.
Just to summarize and make permanent entry of measures here:

**Keep in mind that this measures were taken under car with engine inside, so allow a "~" prefix**

Con rods:
Journal 1
dia ~2,1227 / width ~1,6811 / per con rod width ~0,8346
Journal 2
dia ~2,1230 / width ~1,6811 / per con rod width ~0,8346
Journal 3
dia ~2,1226 / width ~1,6811 / per con rod width ~0,8346
Journal 4
dia ~2,1227 / width ~1,6811 / per con rod width ~0,8346
In all of them I got tight fit of 0,016" feeler so gap is consistent with measuring

Main:
obviously couldn't measure journal diameter...
Between NEW thrust bearing and block I got 0,006" feeler, 0,008" was not even getting close to fit.

In short:
I dropped the K-member (also in order to repaint/powder suspension parts and change bushings) and oil pan. First I attached con-rod bearings one by one journal. Polishing with 1000grit and shoelace was done on each journal (needed or not just to keep consistency). Con rod upper bearings used more with copper visible.
Main bearings same story. Here we had most usage on bottom half of bearing except #5 which was more used on upper half. #1 journal has a very, very light "hump" approximately following upper bearing oiling channel.
Bearings were all used down to copper, but no severe beating visible. Either the engine has a lot more than 90k miles, or there was an abuse (neutral revving, irregular oil changes).
I put in clevite P class STD size con rod and main bearings.
Still have to mount NEW melling pickup tube, melling oil pump, victor reinz blue (drymax) pan seal and brand new shiny oil pan.
After that k-member and suspension fun for few afternoons...

I will assembly all together back. First run or time will show what I have done...

Last question for reassemble: When retightening caps with old bolts, do You use middle or top tolerance torque?

Thnx for Your assistance guys down this road.... I hope I will return with good news!
 
  • Like
Reactions: 1 users
I want mine tight
Same as with wheels
If the spec is 85-105 I want mine at 100+ (lug nuts for instance)
As fancy as your setup is you could use rod bolt stretch to get to the torque required
Just torque them tight
When I was once a journeyman mechanic back in the eighties
I learned from my mentor to just use a wacky packy on those old 360/390 rope rear mains
Used to torque them down and he would laugh a bit
 
  • Like
Reactions: 1 user
Closed the engine after fun with pickup tube (adjusting). It would all be acceptable.... but:

I got the same knock as before bearing change....they were worn, but they were not knocking...
So back to square one:
What does knock and clack and goes away with rev/rpm?
 
Last edited:
Lifters valve springs pistons
Saw a few with #1 piston being too small for the bore
Engineers told us every block machining operation was indexed off #1
The blocks after about a zillion made wore out the machines and they could not control tolerance on ! and 4 any more
Hence the demise of the 5.0
The ones I saw at the dealer with low miles that knocked..
We threw new parts at them and most still knocked
They used to make oversize pistons valves and bearings .003
You will not find that stuff for sbf it was mainly fe stuff I have seen
The oil pressure is good?
The crank end play is now good
Short out spark one cylinder at a time and try to isolate knock
Pull the heads off
By the looks of those bearings it may have a loose piston
Real hard to inspect pistons and wrist pins with them still in the block
Can be done
Replacing one is another very time consuming job

Pull the engine out this time
It will be easier
I know your pain
Find some decent ale or some vodka or something quick
You will get thru this and be laughing about it someday
 
  • Like
Reactions: 1 user
The oil pressure is good?
The crank end play is now good
Short out spark one cylinder at a time and try to isolate knock
Pull the heads off
By the looks of those bearings it may have a loose piston
Real hard to inspect pistons and wrist pins with them still in the block
Mechanical gauge oil pressure after cranking 50psi, 70-80 when I rev it a bit... allthru with knock coming out I am affraid to...
Crank play is perfect now, lower (0.004") factory specification.
I was shorting our plugs several times, only time when there was a change is when I pulled BOTH #5 and #1. Knock went away.
Right there, on first main journal I felt with the finger a very very slight embossed middle of the journal, right where oil passage is. So not groove, but like that part of the journal is rised.

I am not trained mechanic, but engine and journals didn't look bad to me. Bearings were gone, all of them, and that was obvious since I took the cap off.
G** damn, I am closer and closer to pulling the engine for rebuild, this is nerve and time consuming.... but first to confirm 100% change exhaust gasket ans check flexplate....

Are thoose Sealed Power and Enginetech piston and rings from Rockauto any good? I don't want to risk, first sign of wear and I am also changing pistons...

Wrist pin.
That means pulling and tearing the engine down..
Wrist pin would make piston up/down movement lash? Is there any way to confirm 100%? I don't know.... like boroscope camera or wooden stick thu spark plug hole and turning the crank left-right when having a cylinder on TDC?

Right now, I have a condition being affraid of having the same knock after nice shinny rebuild.
I changed water pump, clutch, chain and sprockets, harmonic balancer (THERE ISSUES STARTED WITH HB), lifters, pushrods, rockers, rocker bolts, injectors, and now oil pump, oil pickup, all bottom bearings and I still have a damn knock... as a matter of the fact I have only pistons and camshaft left, or crankshaft (which I could not measure went south)...

Eitherway, thnx for your support up to this point!
 
If knock was from crank bearings it would be audibly less now even if the crank was bad.
 
  • Like
Reactions: 1 user
That sounds a lot like the spacer plate rubbing the flywheel in the video. The plate between the engine and transmission. Almost a scraping noise. It could be just the way the audio picked it up.
 
  • Like
Reactions: 1 user