
You are using an out of date browser. It may not display this or other websites correctly.
You should upgrade or use an alternative browser.
You should upgrade or use an alternative browser.
Engine Foxbody idle/throttle issues
- Thread starter red5.0fox
- Start date

TwoRockTwo
Member
I tested my TPS sensor while the vehicle was running. At idle I was at .98v, I had a friend rev up the car slowly all the way to 5k rpm and the most I saw out of the tps sensor was 1.19v
That TPS sensor is faulty. Replace it.
You shouldn’t test it with the car running, just turn the ignition ON without actually starting the car and then test it.
You don’t need help, you can manipulate the throttle yourself from under the hood while testing.
Even with the way I tested it though, it’s bad correct?That TPS sensor is faulty. Replace it.
You shouldn’t test it with the car running, just turn the ignition ON without actually starting the car and then test it.
You don’t need help, you can manipulate the throttle yourself from under the hood while testing.
Just swapped it, however I can’t even keep it at an idle before it dies. That didn’t start happening until I did the timing so maybe I need to go ahead and do it the proper way. For the short period of time I did have it running with the maf plugged in I still couldn’t rev it throughout its rpm range. Same issue.Even with the way I tested it though, it’s bad correct?
TwoRockTwo
Member
Now you should test the new one. (TPS)
About .98v with the throttle closed
About 4.8-5v with the throttle wide open.
A smooth transition between the two points.
Then get your timing set correctly.
About .98v with the throttle closed
About 4.8-5v with the throttle wide open.
A smooth transition between the two points.
Then get your timing set correctly.
Car does not have to be running to check the sweep on the TPS. Go to post #2:
 stangnet.com
Tps Voltage Question
Hi all, just picked up a 86 LX, and think I've run into a idling issue. The motor is a 306 EFI, GT40 Crate motor 42lb injectors Bama 4 Bank Chip 70MM TB 76MM Turbo/w 10lbs boost B303 Cam GT40X Heads The car has a hard time idling for the first 30 seconds or so. I've got play with the gas pedal...
stangnet.com
I'll be doing that next time I get a chance. Hopefully tonight.Car does not have to be running to check the sweep on the TPS. Go to post #2:
Tps Voltage Question
Hi all, just picked up a 86 LX, and think I've run into a idling issue. The motor is a 306 EFI, GT40 Crate motor 42lb injectors Bama 4 Bank Chip 70MM TB 76MM Turbo/w 10lbs boost B303 Cam GT40X Heads The car has a hard time idling for the first 30 seconds or so. I've got play with the gas pedal...
Anything between 0.5 and 1.25V is acceptable at idle. You don't need to target a specific number (0.99 for example). Just turn the key to on. Do you have around 1V? then you are good. Depress the pedal. Does it go to more than 3.5-4V? Then it's range of sweep checks out.
A running car might have a slightly higher voltage. Might be 0.85v with engine off, and 0.86 with it running. Both are acceptable
A running car might have a slightly higher voltage. Might be 0.85v with engine off, and 0.86 with it running. Both are acceptable

Just tested it. .95v throttle closed, gradual sweep all the way to 4.6v. Guess that’s checked off..Anything between 0.5 and 1.25V is acceptable at idle. You don't need to target a specific number (0.99 for example). Just turn the key to on. Do you have around 1V? then you are good. Depress the pedal. Does it go to more than 3.5-4V? Then it's range of sweep checks out.
A running car might have a slightly higher voltage. Might be 0.85v with engine off, and 0.86 with it running. Both are acceptable
I’m pulling my heads here soon as my shop teacher is going to resurface, aswell as port them. So it won’t be running for a while but I’m gonna take the time to do the timing and such on it before I’m thinking. That way I can properly eliminate that.
TwoRockTwo
Member
I would get it timed correctly and see if your issue is fixed now. (The TPS might have solved most of your issue)
That way when you do upgrade parts in the future, you won’t have an underlying issue that could be further complicated with additional issues arising from swapping out more parts. Which makes troubleshooting harder.
Porting a set of GT40’s … well are you talking about gasket matching or the more in depth porting of runners and bowls?
It’s almost not worth the effort/ money to begin with, but the more in depth porting requires alot of experience & knowledge. Without it you could end up with a worse off flowing head than it was stock.
I say get it running and drive it some, you might not see the need for porting afterwards to get that handful of extra power.
The porting is free through the school. It would be full in-depth with the CNC machine aswell as flow tested. We’re in that class right now so since I applies to the school I can get it done for free. I’ll definitely get the timing done and such because I’d like to drive it here to get it done.I would get it timed correctly and see if your issue is fixed now. (The TPS might have solved most of your issue)
That way when you do upgrade parts in the future, you won’t have an underlying issue that could be further complicated with additional issues arising from swapping out more parts. Which makes troubleshooting harder.
Porting a set of GT40’s … well are you talking about gasket matching or the more in depth porting of runners and bowls?
It’s almost not worth the effort/ money to begin with, but the more in depth porting requires alot of experience & knowledge. Without it you could end up with a worse off flowing head than it was stock.
I say get it running and drive it some, you might not see the need for porting afterwards to get that handful of extra power.
Just an update: I haven't done anything yet as I've been super busy. I did grab a new battery because I'm pretty sure the old one toasted itself (it was under warranty anyways). I plan to get back to testing everything soon, and will keep everyone updated!
I got around to doing the timing today and installing the new battery. Timing process is as follows: Unplugged spout connector, pulled #1 plug, insert small paper towel, turn engine over by hand until towel shoots from the cylinder, then continue to turn the engine until you reach 0 degrees, reinstall everything, start engine, set timing to 10 BTDC using timing gun, reinstall spout connector. Those are the steps I followed, car now starts and idles, but the main problem is still fully present. Just for kicks, I used my harbor freight misfire tool and tested all of the cylinders for a dead cylinder at idle. All seem to be firing consistently with eachother. I did get to thinking however.. could this be a distributor problem? My dizzy is just a cheap autostore knockoff. I've had a few of them in the car before. Should I go ahead and get a better quality one? If so, what are the recommendations? I'm now back to working my job full time so I am expecting to have some more money I can use for this project. One of the things on my list is going back to a stock intake over using this cheap SVE one. Any other recommendations are appreciated.
As for timing the motor you need to go back to when the paper towel pops out. When this happens you need to insert a small diameter rod (screw driver, wire, etc.) down into the cylinder until you contact the top of the piston. When the piston quits rising note the degree on the balancer. Continue to rotate the engine until the piston just starts to drop and note the digress on the balancer. This is called piston dwell. Subtract one number from the other and back the motor up that many degrees. This is TDC and if your balancer isn’t reading zero then it’s either slipped and needs to be replaced or something else not so bueno is up.
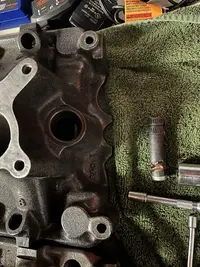
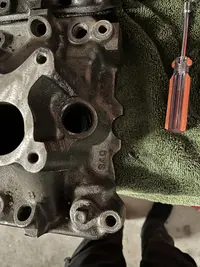
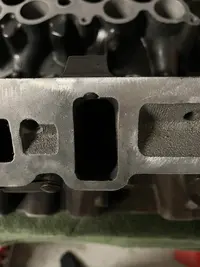
Alright guys, another long time no see. If you’re wondering why I keep going so long between posting it’s just that I lose motivation to continue. Anyway, I’m at an ultimatum where I am joining the airforce around September, and I want to bring this car with me if I’m going somewhere with okay weather. That being said, I need this thing running. Since my last post, the most recent thing I’ve done is replace the lower intake gaskets, and ensure the surface is as smooth as possible. Also re-did the timing the way everyone here has said. No change in the way it runs. Vacuum leak is still there (sounds like it’s close to where the thermostat housing is), and it smells super rich. I set the timing to where I could keep it running. Setting it to 10-12° BTC was not enough to keep it idling. So I just turned it until it would. Currently, I have the engine torn down to the intake valley, and I am exchanging the lower intake with another I had sitting around, and I noticed some design differences that I wanted opinions on. I’ll try to link the pics. First pics will be the intake I was running previously, then compared to the “new” intake (my intake has the gasket material on it still). Both are explorer EGR intakes. It seems like the ports are bigger on mine, and the backside of the intake has different designs. Also, on the thermostat side, towards the very back, mine does not have a threaded hole, but this other one does. I am also considering replacing the head gaskets because I cannot tell if the coolant that keeps appearing in the valley is from me spilling it, or if it was already there. There was coolant both times. If I replace the gasket, I’m also hot tanking the heads, and I’ll go through the push rods, rocker arms, and set everything aswell as inspect for improper wear. I’ll also check the piston bore’s for any damage, but I’m unsure if I want to just test this new intake first, or go ahead with the head gaskets. Anyways, some insight would be appreciated.
Attachments

Pull the heads now if you have any kind of doubt as doing this again would surely suck. We were just discussing the rear coolant passage being tapped on some uppers and not on others here:
stangnet.com
Engine - 66 heater box hoses to 5.0 heater hard tubes
I'm working with my son on the 66 with a 1993 5.0 swap. The heater box was toast so we replaced that in the fall. The fan motor bench tested A-OK on it's own and mounted in the heater box before installing in the car. However, now the squirrel cage is rubbing loudly in the housing. I...
stangnet.com
Just checked it out, realized it’s not something I need lol. I’m just gonna stick an old sensor with the same threads in there to plug it. What about the other differences?Pull the heads now if you have any kind of doubt as doing this again would surely suck. We were just discussing the rear coolant passage being tapped on some uppers and not on others here:
Engine - 66 heater box hoses to 5.0 heater hard tubes
I'm working with my son on the 66 with a 1993 5.0 swap. The heater box was toast so we replaced that in the fall. The fan motor bench tested A-OK on it's own and mounted in the heater box before installing in the car. However, now the squirrel cage is rubbing loudly in the housing. I...
To me the old intake has some pretty rough surfaces where the gasket mates up that I would probably use a thin layer of gasket maker to help seal up.
Another thing you can do is get lower intake studs in lieu of bolts.
ARP also has them but about 2.5 times more dinero:
I run them on the 331 in the Coupe and 351 in the T-Bird. They help line the intake up when you install it and have less issues (read none) with them becoming loose over time.
Another thing you can do is get lower intake studs in lieu of bolts.
ARP also has them but about 2.5 times more dinero:
I run them on the 331 in the Coupe and 351 in the T-Bird. They help line the intake up when you install it and have less issues (read none) with them becoming loose over time.
I’ve definitely been looking at those studs. Including the head studs, valve cover studs, essentially everything. However, I’m a college student making $11 an hour lol. I’ll try to pick some up. What about the port differences right where the injector sprays? What’s up with that? Factory differences, or was something like that done aftermarket?To me the old intake has some pretty rough surfaces where the gasket mates up that I would probably use a thin layer of gasket maker to help seal up.
Another thing you can do is get lower intake studs in lieu of bolts.
ARP also has them but about 2.5 times more dinero:
I run them on the 331 in the Coupe and 351 in the T-Bird. They help line the intake up when you install it and have less issues (read none) with them becoming loose over time.
Similar threads
- Replies
- 12
- Views
- 850
- Replies
- 9
- Views
- 645
- Replies
- 16
- Views
- 930
- Replies
- 4
- Views
- 1K