
You are using an out of date browser. It may not display this or other websites correctly.
You should upgrade or use an alternative browser.
You should upgrade or use an alternative browser.
Progress Thread SN95 "Project Father & Son" 1994 GT
- Thread starter VibrantRedGT
- Start date


Your on the downward spiral now!
Well a lot went down.
Shelby got endorsed by Nike
I've decided the Booster and Master cylinder must be removed so that's coming out this week.
I finished painting the passenger valve cover, the battery tray is complete too.
All the smog is gone so I made an EGR delete real fast.
I bagged and tagged everything.
If it wasn't a million degrees I would have kept going.
How do you get rid of the egr codes?
Quite easy, take the EGR cap off until you see the plunger. Now press that in, glue it...zip tie it, whatever will work then plug it into the connector. The ECC will see the EGR as functioning.
Scroll up to all the parts in the baggy's. See the EGR on the bottom row? See the silver rod / plunger? That's what I'm referring to.
I'll put it in one of the videos when I get to it.
Getting rid of some holes, for instance this car had hood pins. After they removed this was crap that was left.
I've already put glazing putty and the gaps have been filled. I just forgot to take pics.
 Untitled by jpjr501, on Flickr
 Untitled by jpjr501, on Flickr
 Untitled by jpjr501, on Flickr
 Untitled by jpjr501, on Flickr
I've already put glazing putty and the gaps have been filled. I just forgot to take pics.
Body work in the engine bay has begun.
BEFORE
 Untitled by jpjr501, on Flickr
AFTER
 Untitled by jpjr501, on Flickr
Passenger side, filled with steel those big holes from the stock air box. Still have to sand it all but here is a shot in progress.
 Untitled by jpjr501, on Flickr
I"m cover all those small rivets welds and even though this area will be cover I still have to make it nice.
 Untitled by jpjr501, on Flickr
BEFORE
AFTER
Passenger side, filled with steel those big holes from the stock air box. Still have to sand it all but here is a shot in progress.
I"m cover all those small rivets welds and even though this area will be cover I still have to make it nice.
Radiator support complete.
 Untitled by jpjr501, on Flickr
That goop on the passenger side is duct tape. I'm going to remove that and weld in a piece of steel to seal that hole off (not needed). It's raw under there so it's ready to weld, didn't want primer all over it.
 Untitled by jpjr501, on Flickr
All I need is the moisture filter and the Crystal white paint. Scratch that, the booster and clutch cable need to come off so I can prep the firewall first.
 Untitled by jpjr501, on Flickr
It's 92 degrees and Shelb's is laying in the sun, so weird but she loves the sun.
 Untitled by jpjr501, on Flickr
That goop on the passenger side is duct tape. I'm going to remove that and weld in a piece of steel to seal that hole off (not needed). It's raw under there so it's ready to weld, didn't want primer all over it.
All I need is the moisture filter and the Crystal white paint. Scratch that, the booster and clutch cable need to come off so I can prep the firewall first.
It's 92 degrees and Shelb's is laying in the sun, so weird but she loves the sun.
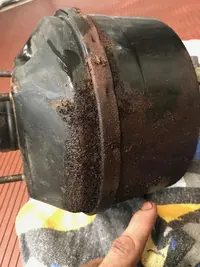
What a pain this is to take out a booster.
Apparently the entire assembly had been leaking a long time. The fluid has rusted out a section of the K-Member. Every time I pull something off this car it reveals more work and money for me. That's why we call it the Onion. Peel the layers and it gets worse.
Look far down on the third pic, I tried to put light on it.
 Untitled by jpjr501, on Flickr
 Untitled by jpjr501, on Flickr
 Untitled by jpjr501, on Flickr
Apparently the entire assembly had been leaking a long time. The fluid has rusted out a section of the K-Member. Every time I pull something off this car it reveals more work and money for me. That's why we call it the Onion. Peel the layers and it gets worse.
Look far down on the third pic, I tried to put light on it.
Attachments

That sucks... but glad you caught it before it suggested ot the frame rail.
I'm going to have to put POR15 on the K-member and surrounding areas to prevent rust from spreading. I really want to do just a tubular K-Member but I can't right now, just too many things to do.
Knock off the scales, ospho it, por15 coat it, come back to it at a later date.
That's the plan.
Just ordered:
New Master Cylinder (not reman)
Cardone Booster (I worked for Cardone for 16 years, had to give them something back)
Motorcraft Fuel Filter
Total: $133.94 after I return the Booster Core ($45.00)
I worked on the Upper / Lower intake this weekend. This is the stuff you never see on YouTube. I bought the intake used, came with ZERO hardware so I had to make or buy my own. I also have a couple of areas where I need to cap off. Lastly, I put it all together to make sure it was perfect.
 Untitled by jpjr501, on Flickr
 Untitled by jpjr501, on Flickr
 Untitled by jpjr501, on Flickr
 Untitled by jpjr501, on Flickr
 Untitled by jpjr501, on Flickr
 Untitled by jpjr501, on Flickr
 Untitled by jpjr501, on Flickr
New Master Cylinder (not reman)
Cardone Booster (I worked for Cardone for 16 years, had to give them something back)
Motorcraft Fuel Filter
Total: $133.94 after I return the Booster Core ($45.00)
I worked on the Upper / Lower intake this weekend. This is the stuff you never see on YouTube. I bought the intake used, came with ZERO hardware so I had to make or buy my own. I also have a couple of areas where I need to cap off. Lastly, I put it all together to make sure it was perfect.
The Booster, Master Cylinder and Fuel Filter arrived yesterday.
It looks as though I'm going to have to paint that boost, kind of dingy.
 Untitled by jpjr501, on Flickr
It looks as though I'm going to have to paint that boost, kind of dingy.
I made the mistake of not painting my booster. It looks rusty as hell now.
Well, I scuffed up the booster to paint and it actually looks great. I had even prepped for paint with covering everything in aluminum foil (Dollar Store).
I may just shoot it in clear and call it a day.
Do like Mike, and get a paint brush and rustoleum that thang.I made the mistake of not painting my booster. It looks rusty as hell now.
Whatever paint they put on the booster its deceptive...You could see mine turning orange more and more every day. I don't know that I'd clear coat anything...I think the booster needs a sho-nuff coat of paint on it.
Similar threads
- Replies
- 24
- Views
- 1K
- Replies
- 0
- Views
- 415
- Replies
- 23
- Views
- 1K